Last week as part of our client project I had to use an iterative macro for the first time to solve a problem that the client was facing. In general I wanted to work through a list of postcodes, assigning them one by one to a sales person, based on whoever had the lowest turnover value assigned to them on each iteration. In the Data School we have not yet covered this level of Alteryx so it was up to myself to work out the solution and to learn the techniques that would be used to get to the solution. The end result was this workflow which can be seen below:

Iterative Macro Workflow
It is in essence a very simple workflow but there are numerous complexities that took me a while to figure out.
The Workflow
It starts by bringing in two different sources of data. The first one being a list of each postcode with its “code”, the turnover attributed to that postcode and a spatial object that represents the polygon of the postcode district. The second data source is a list of our “sales employees”. This contains each employees name, their home postcode, the turnover for that home postcode and a spatial centroid for their location.
The basic idea behind the macro is that this info is then summarised and sorted to find the lowest turnover for the employee, their location is then fed into a “Find Nearest” tool to find the next nearest postcode to their home. The join tool at the start prevents postcodes being duplicated in this “Find Nearest” tool, at the first iteration of the macro all the postcodes are able to be searched apart from the “home” postcodes. As the macro continues the join tool will filter out any postcodes that have been matched.
You will notice the macro has two outputs, the top output is for end results, this builds up a list of “matched” postcodes from the “Find Nearest” tool and adds a “Page Number” to each output (this will allow us to build an animated map showing the macro progress at a later point).
The second output is used as our “Iteration Output”. The results from the “Find Nearest” tool are “union-ed” on to the original employees list and then output. We now need to set the macro up to take this output and feed it back into the “Employees” input for as many times that is necessary to assign every postcode to a sales employee.
Settings

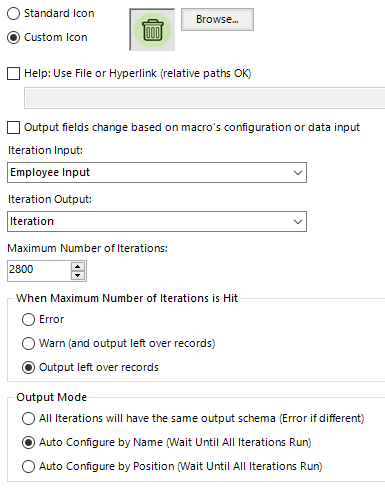
Iterative Macro Settings
You can see these settings in the above window. I have also set the maximum number of iterations to be 2800, this is just above the number of postcodes we have in our database. To improve the performance of the iterative macro it would be better to set an actual “stop” in the workflow that would get the macro to stop iterating when it has run out of postcodes. This is something I will look to implement later this week and will write a subsequent blog post on the topic when I can achieve this.
Conclusion
For now I hope this has given you an insight into the basics behind the iterative macro that formed part of my Data School presentation last week. To recap the basics behind an iterative macro:
- Can be run for as many times as necessary to process every record in a certain field
- Ultimately should be a simple workflow as it is run potentially thousands of times, do not want to have to wait hours for it to run!
