


Whether you’re trying to get familiar with the Tableau Output tool or trying to troubleshoot an error that’s come up, this blog provides an overview of the tool’s settings and recommendations for resolving errors. The first section goes over the tool’s functionality and how to install it, the second and main section goes over my 7 tips that resolve lots of common errors, and the third section lists error messages and gives a brief summary of the likely causes and Alteryx help resources.
I want to thank Ollie Clarke, Finn Charlton, Luke Donovan, and Jonathan Allenby at The Information Lab, who helped me troubleshoot the tool and provide some of these fixes, as well as write most of the third section that I’m including in this post.
Installing and Using the Tool
The Tableau Output tool allows you to publish data to Tableau Server from an Alteryx workflow. This provides important compatibility when working between Alteryx and Tableau, and is especially useful when you want the output of a workflow to be shared on Tableau Server for multiple users or workbooks to reference, or are scheduling workflows to dynamically update data sources on Tableau Server.
This tool replaces the now deprecated “Publish to Tableau Server” tool, and it writes in Python rather than the old tool, which was constructed as a macro that referenced a previous version of the Tableau API. The switch to a new tool is partly because Tableau has moved to using multi-factor authentication, and it now also supports Alteryx’s Data Connection Manager, offering greater data security.

https://marketplace.alteryx.com/en-US/apps/417931/tableau-tools
The Tableau Output tool is part of an Alteryx add-on package called Tableau Tools, which also includes the Tableau Input tool. Tableau Tools is free to install from Alteryx Marketplace by navigating to the get add-on button - make sure to download the version that matches with your version of Alteryx Designer. This will download a .yxi file, which you can open to set up the installation of the tools (I recommend installing as an admin, which I will explain later). Once installed, the tools will appear in the “connectors” tool palette in Alteryx Designer, or you can just type “Tableau” into the search bar.

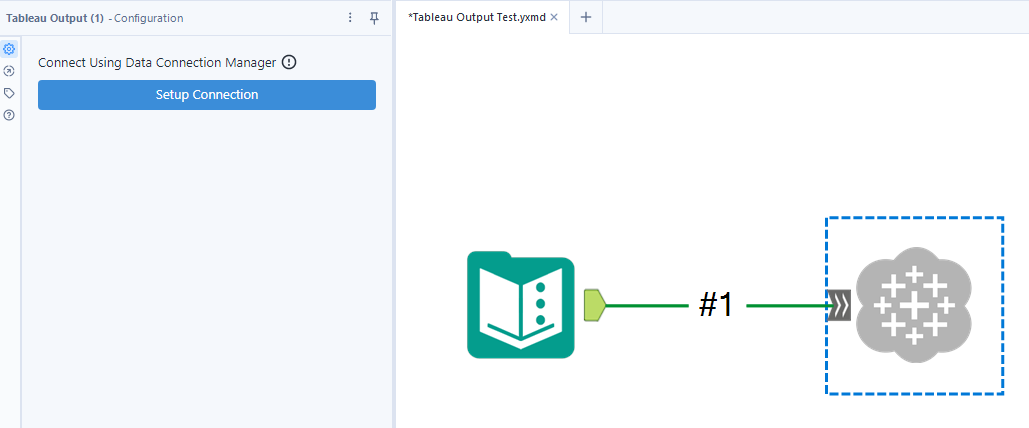
To use the tool, place it at the end of your workflow or wherever you want your output to come from. In most cases you will make one connection to the tool, but its input anchor can accept multiple connections to create multiple tables in a data source (which is specified in the tool settings). First, you’ll have to connect to your desired server using Alteryx’s DCM. Start by clicking “setup connection” and then create a new data source, where you input a name for the connection (can be anything), your server URL (starting with https and ending with the / after server name), and the site name you want to connect to (as it appears in the Tableau Server URL following ‘site/’, often spelled or capitalized differently than it appears in the site dropdown).


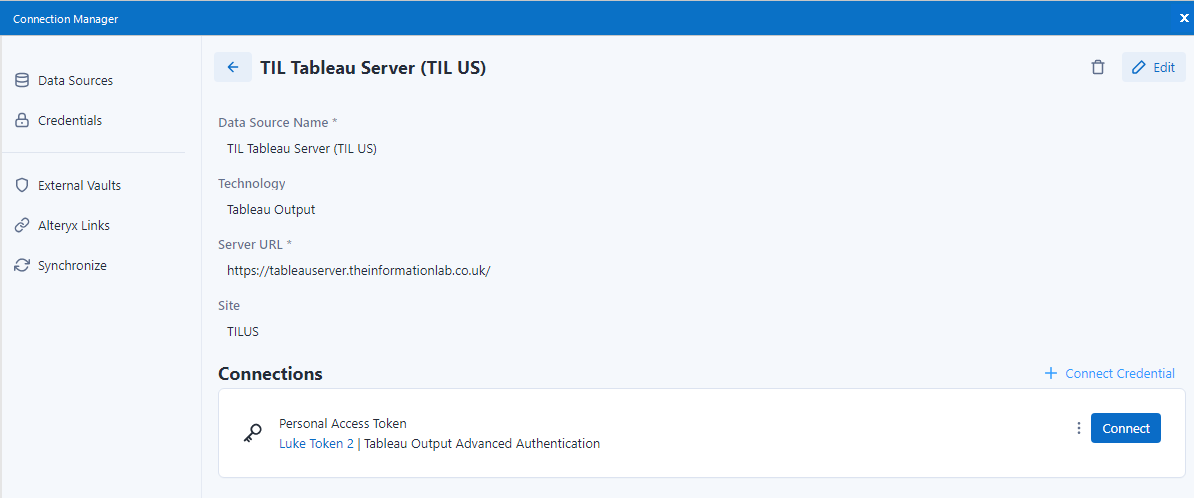
Next, you’ll have to specify a way to connect, either with your Tableau Server username and password, or with a personal access token. Alteryx recommends using a personal access token, particularly if you’ll be scheduling the workflow, but either should work for most cases. To obtain your Tableau Server access token, go to your user setting in Tableau Server: by your icon in the top right > My Account Settings > create a token under “Personal Access Tokens” (as seen below). You can then use this to create a new credential, pasting in the name you’ve given the token and its secret into Alteryx.

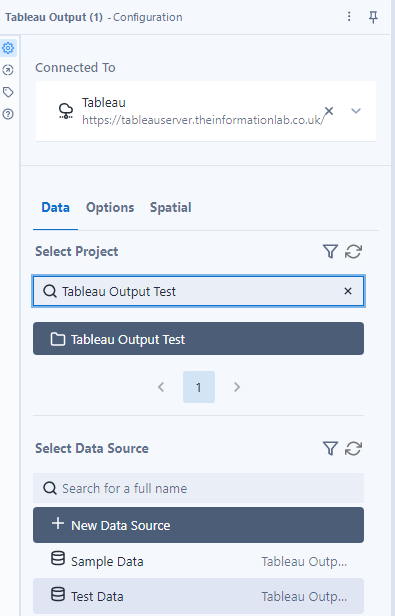
Once you’ve successfully connected to the desired Tableau Server and site and embedded your credentials, in the Data tab of the tool, you’ll navigate to the project (Tableau Server folder) you want to upload or modify data in. When searching for a project, make sure you search for its full name. Then, you can choose to create a new data source or modify an existing one within the selected folder.
In the Options tab, you can choose whether you’re creating a new data source (which you will have to create a data source name for), overwriting an existing one (what you’ll commonly use when refreshing data), appending / adding data to an existing table, updating existing records from selected columns, or updating existing records and adding data when no records are found (upsert). The other settings in the Options pane can generally be left alone. You will input data source metainfo (the file path of the tableau data extract) if the data source has multiple tables. The encrypt at rest setting is meant to encrypt the data your data source, but this doesn’t seem to do anything in my testing - the data source was unencrypted on Tableau Server when having this ticked. If you’re connecting multiple inputs to the tool, you’ll specify table names here, and can also use the box at the bottom to specify SQL commands.
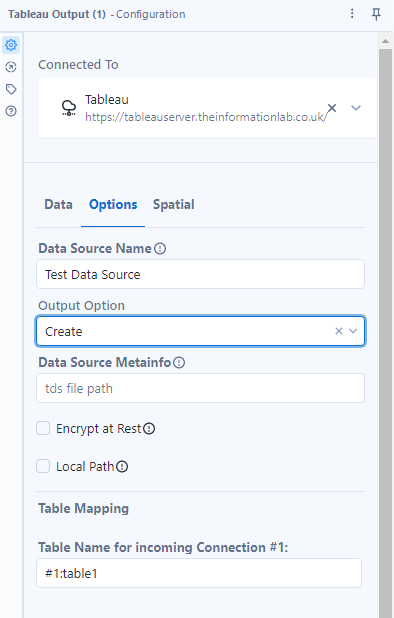
There is also a spatial tab, where you can select columns that include spatial data to make sure they are recognized as spatial data types in Tableau.
Once you run your workflow with the Tableau Output configured, you should hopefully see the message “Tool execution completed” and no errors, and can verify what you’ve uploaded in the Tableau Server project you specified.
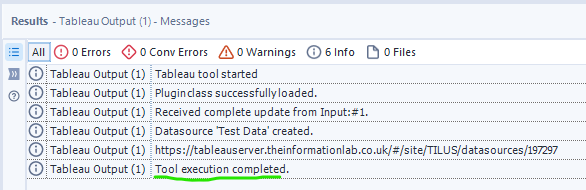
If you weren’t so lucky, keep reading the next section of this blog.
Common Errors with Tableau Output and Advice on Solving Them
Unfortunately, it’s no secret that the Tableau Output tool can be prone to errors, particularly with the Python it’s writing or authenticating between Alteryx and Tableau Server. Some errors occur immediately upon the workflow reaching the tool, such as “Failed to read port assignment Internal Error - Deadlock detected” which I encountered upon first trying to use it, and others will occur after part of the tool’s process has been successful. Be sure to look through the messages tab of Alteryx’s results pane to research the error message you’re getting and when it occurs.
I’ve arranged these tips roughly by the likelihood they will solve your issue. Feel free to change one and then test, continuing down the list, or search based on a specific error (at the end).
Tip 1: Install the tool as administrator
Installing the Tableau Tools as administrator can solve many common issues with the tool, including the failed to read port assignment error I mentioned earlier. When installing Tableau Tools, you’ll likely double click on the .yxi file or open it in Alteryx (file > open workflow), which will install the tool in the AppData folder location (you can see the file by typing %appdata% in the Windows search bar > Alteryx > Tools folder). To install as admin, you want to run Alteryx as administrator (right click the program’s icon on your desktop > run as administrator) and then open the .yxi in Alteryx (file > open workflow), and select “install for all users.” Note that double clicking the .yxi file to install while not inside Alteryx won’t work to install as administrator. After installing as admin, the tools will be in programdata rather than appdata. To view the ProgramData folder (it is hidden in Windows by default), go to File Explorer > View > show > check “Hidden items.” The ProgramData folder can then be found in File Explorer in your C: drive.

Tip 2: Edit DCM Settings
A common error with recent versions of Tableau Output is “cannot serialize None (type NoneType)” - this error suggests problems with the Python being written and usually relates to problems with DCM. I was able to fix this error by editing my DCM settings within Alteryx.
You want to make sure your settings aren’t preventing any DCM connections. In Alteryx, go to Options > User Settings > Edit user settings, and override DCM Settings. You want to make sure SDK Access Mode is set to “AllowAll.”

Tip 3: Problems when working with Tableau Output on Alteryx Server
Synchronize your credentials
If you’re using Tableau Output with Alteryx Server, such as publishing to Gallery and / or scheduling your workflow, make sure your credentials are synchronized with Alteryx server. In Alteryx, go to File > Manage Connections > synchronize > add information about your Alteryx server (if you don’t have it saved here already) > click on it and then synchronize. If you’re publishing your Alteryx workflow, it’s also advised to use a Tableau Server personal access token rather than username and password for Tableau Output.
Sharing DCM Credentials on Server
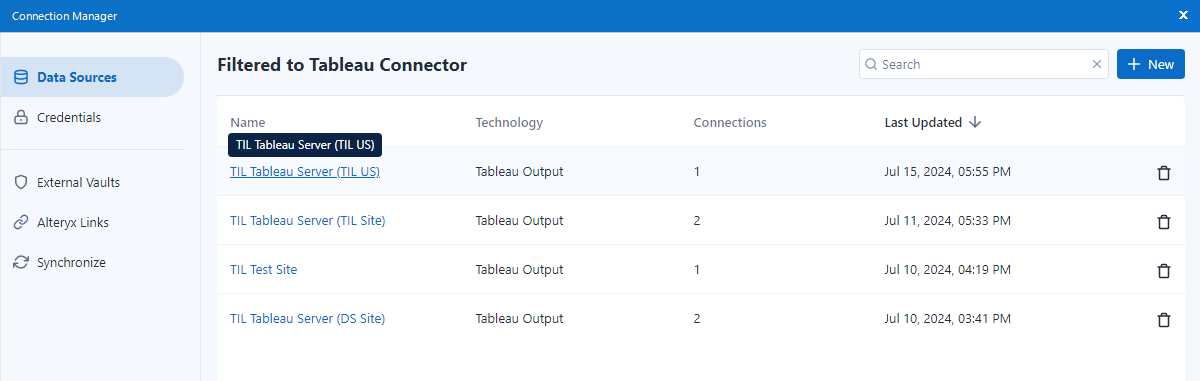
If you’re accessing a workflow on Alteryx Server that uses Tableau Output, it might work for the person who published it but not users it's shared with (i.e. owner can manually run workflow on server successfully but other users get an error). To fix this, you need to share your DCM credentials with the users you want to have access to the workflow. To do this, go to the DCM Data Sources tab in Alteryx Server, select your data source (likely the Tableau Server name, depending on what you named it), then go to share under connections, click “Add User,” search for a user you want to give access to, and make sure “Tableau Output Advanced Authentication” is selected.


Tip 4: If you’re uploading date fields, try converting them to strings
Many users have reported that the presence of fields with Date or DateTime data types prevent Tableau Output from working. Converting these to strings, for example in a select tool right before the Tableau Output in your workflow, can resolve these errors. Though it is slightly cumbersome to not have your date fields in the correct type when you bring them into Tableau, you can easily fix this with a Date(your field) calculated field in Tableau.
Tip 5: Test different Output Methods
As mentioned previously, the Tableau Output tool has 5 different output methods (create, overwrite, append, update, upsert). Sometimes, the tool has a harder time creating a new data source than the other methods, which update an existing data source. If you’re getting an error when trying to create a data source, try overwriting an existing data source to see if that works. You can export your data as a flat file, bring it into Tableau Desktop and publish the data source to server via the data source tab. Then you can try overwriting it with Tableau Output to see if that works.

Tip 6: Have you tried turning it off and on again?
When your Tableau Output tool has previously errored and you’ve changed some settings to try to fix it, it’s best practice to delete the tool from the canvas and place a new one. The new tool will be given a new tool ID, and can help refresh it.
Similarly, after changing settings, you may have to close and restart Alteryx for the changes to take effect. When I was first able to fix the pesky error messages I was getting, the tool only started working after restarting Alteryx.
With some of the errors outlined below, copying the entire workflow onto a new canvas can fix the issue.
Tip 7: Check the settings of the Site on Tableau Server you’re publishing to
For those unfamiliar, you can create multiple sites on one Tableau Server, which offer distinct locations to publish data sources, workbooks, and project folders. Sites also have settings options that can vary site-to-site.

Interestingly, the success of the Tableau Output tool can vary for different sites within your Tableau Server. I noticed this when testing the tool for various sites on The Information Lab’s Tableau Server - it published fine to some of the sites but returned the cannot serialize None: (Type NoneType) error for others. Upon searching through the site settings, the one setting that was consistently different between sites that worked and those that didn’t was the Extract Encryption at Rest setting. With the exception of one site that had it enabled (but with 0 encrypted extracts on the server), every site with extract encryption set to enable or enforce returned the NoneType error when trying to publish, whereas Tableau Output worked with no issues for all of the sites with extract encryption disabled. This suggests that Tableau Output has trouble dealing with data source encryption on Tableau Server, and it’s worth checking this setting on your Tableau Server sites. This also maybe explains why the Encrypt at Rest setting within Tableau Output didn’t seem to do anything - perhaps this is a bug that needs to be fixed.

To learn more about extract encryption on Tableau Server, go here: https://help.tableau.com/current/server/en-us/security_ear.htm
Specific Error Messages and More Information
This section includes some common error messages and provides context and troubleshooting suggestions. This was primarily written by Finn Charlton, Ollie Clarke, and Jonathan Allenby - I’ve added a few more and supplemented some of the documentation and solutions.
“cannot serialize None (type NoneType)” or “'NoneType' object has no attribute 'get'” errors
Likely related to DCM or other problems authenticating to Tableau Server. First step should be to change DCM settings to have SDK set to AllowAll (see Tip 2 above). Can also try checking Tableau Server site settings (extract encryption - Tip 7) and overwriting rather than creating a new data source (Tip 6).
“Failed to read port assignment: Internal Error: Deadlock detected” error
This is a problem with the tool itself, try reinstalling Tableau Tools as admin (Tip 1).
Connection to platform was not successful
This error can sometimes occur after you’ve changed settings and just need to replace the tool and restart Alteryx. Other times, it could be a proxy or permissions issue with your server, or if you’re using multiple Tableau Outputs in one workflow you might want to try using the Block Until Done tool to get them to work one at a time.
All incoming anchors closed, but plugin has errors
There are other errors on the canvas.
Got an invalid value for "Column", it must be a *data type*
There are null or empty values in the column that it can't properly convert to the required datatype.
Failed to signin to Tableau - While using PAT login on Alteryx Gallery
The tool needs a specific DCM setup to work with PAT on Gallery (at least with old versions)
[WinError 2] The system cannot find the file specified: *temp location*\\TableauOutputToolDel\\*hyper file*.hyper - Sometimes after succeeding to upload a subset of data
Unknown why this happens - it can help to copy the whole workflow to a new canvas, but the error can come back.
Failed to create .tdsx file
This may happen if you’re trying to create multiple tables in one data source and thus need to input tds file path. The error occurs because you haven't followed the very specific process for creating and editing a .tds file correctly. One method that may fix this is to use the Tableau Output tool to create a local hyper file containing the two (or however many) inputs, to then make a tds file in the right format. You then go into this hyper in Desktop, edit your data model if desired (like make a relationship between two tables), make a tds - then use the Tableau Output tool again with this tds to send to server.
- Post related to previous version of the tool: https://theinformationlab.nl/2018/12/11/create-tds-publish-to-tableau-server-tool-in-alteryx/
Tool adds 70 years to dates
This has been fixed in v1.2.1 but worth noting in case anyone is reporting the same thing and using an old version of the tool.
Configuration pane goes blank after successful sign-in
Users are seeing an issue with the tool in that after they authenticate, the configuration pane goes blank. It appears for a second and then goes entirely blank.
- Appears to be related to DCM in some way.
- https://community.alteryx.com/t5/Alteryx-Designer-Desktop-Discussions/Tableau-Output-tool-display-empty-after-successful-connection-to/td-p/1177754
We are not supporting spatial data at this time. All incoming anchors closed, but plugin has errors.
Specific bug with 2022.1 + tool v.1.3.1 not working with a SpatialObj field, same workflow runs fine on 22.3+
Failed to start a new Hyper instance
Anti-virus / proxy server interference of a component of the macro. Whitelisting this component fixes the issue. Can also be caused by corruption of the component - in this case a 'nuclear' uninstall and reinstall is the only fix.
- https://knowledge.alteryx.com/index/s/article/Failed-To-Start-A-New-Hyper-Instance
- https://knowledge.alteryx.com/index/s/article/Alteryx-Designer-How-To-Troubleshoot-Failed-to-start-a-new-Hyper-instance#:~:text=In%20some%20cases%20a%20customer,then%20reinstall%20of%20Alteryx%20Designer.
Workflow crashes using DCM
Something that seems to be new is that on certain instances of Alteryx, when using DCM, it causes the entire workflow to crash and not respond. Works fine when using the interface. Alteryx Support are aware of this and it should be solved in current versions of the tool.
Was previously fixed by deleting any tool that was using DCM, copy everything, paste into a brand new workflow and set up DCM again.
Conclusion
While there are many different errors you can encounter on your journey with the Tableau Output tool, the main tips I’ve outlined should solve a lot of these issues. Keep in mind that the errors may change (and hopefully be fixed) in subsequent versions of Alteryx and the Tableau Tools, and that some problems may be specific to your organization’s settings and server environments. With that said, good luck with your Tableau Outputting, and may the error messages leave you alone.