


In the past, I've written several blogs on how to fetch data from calling an API using Python scripts with TabPy in both Tableau Desktop and Tableau Prep Builder. If you haven’t checked them out yet, feel free to explore those posts (Tableau Desktop, Tableau Prep).
However, Tableau now offers another way to connect to APIs without the need for Python scripts or setting up TabPy. This comes in the form of the REST API Connector. In this blog, I'll walk you through:
- How to install the REST API Connector on computer
- What is JSON Path?
- How to use it to fetch data from an API
- The pros and cons of this tool compared to using TabPy
1/ How to install the REST API Connector on computer
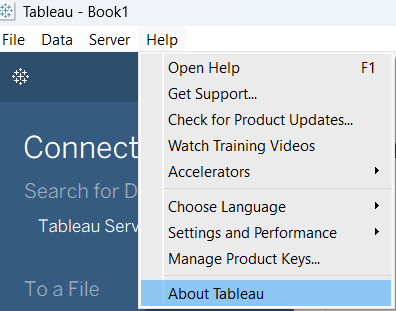
Before installing this tool, make sure that you are using Tableau Desktop version 2023.3 or later. You can check it by going to Help > About Tableau.
Currently, I'm using Tableau Desktop version 2026.1.0 and the same for Tableau Prep Builder. After confirming the version of Tableau Desktop/ Tableau Prep Builder, we will go ahead to download the driver at the page: https://exchange.tableau.com/products/1111
If you scroll down, you will see the Installation part like this:

Click on the hyperlink Driver Download to download the REST API Connector to your computer. You need to sign in with your Tableau account to download.
Then, you will see all drivers sorted in alphabetical order. Scroll down to REST API (JDBC). You will see the instruction how to install the driver.
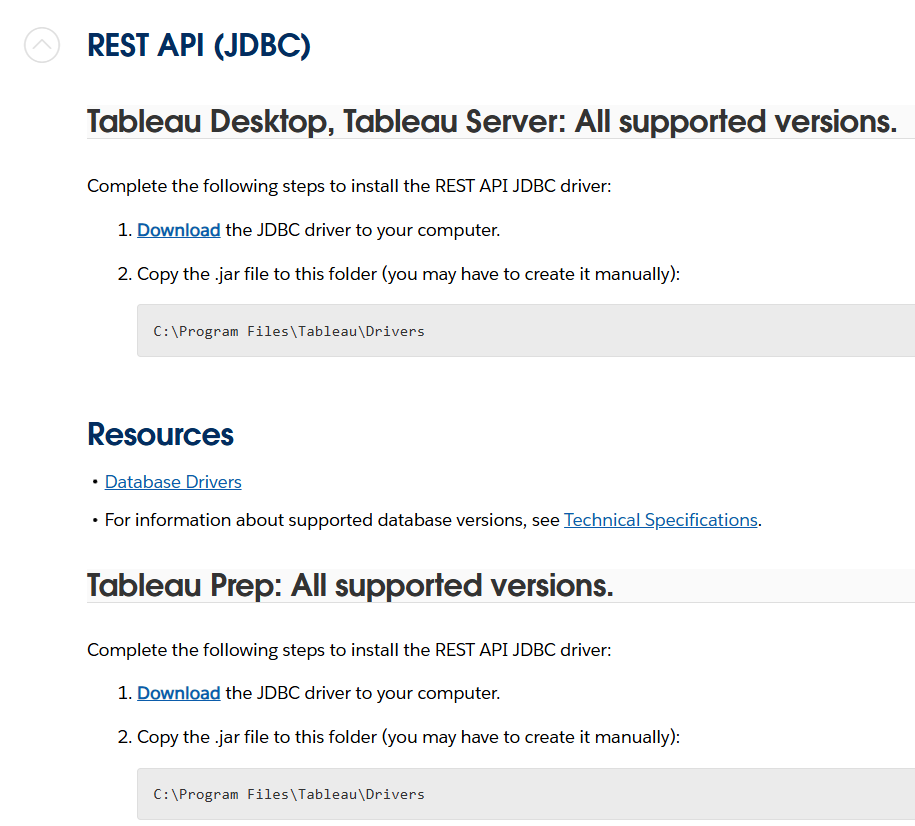
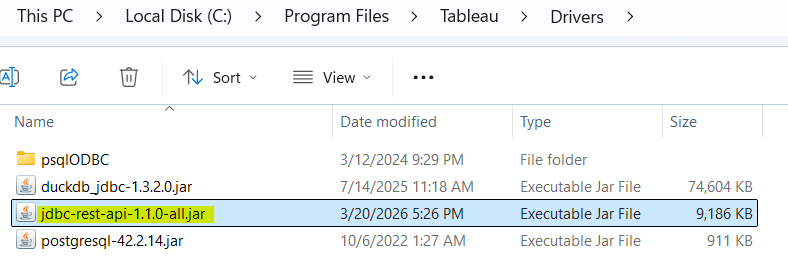
Click on the Download hyperlink to download the driver to your computer. Then, copy that .jar file into the Drivers folder (Fig. 3) if you are using Windows OS. If you are working on another OS, then check Fig. 2 above.
Cool! Now you have already installed the driver for the REST API Connector on your computer!
2/ What is JSON Path?
In my previous blogs, I explained the JSON structure with objects and arrays. You can read it here. Understanding the JSON structure is important because you then know how to flatten data.
I will take the example from the previous blog again. You can check the URL here: https://pokeapi.co/api/v2/ability?offset=0&limit=367
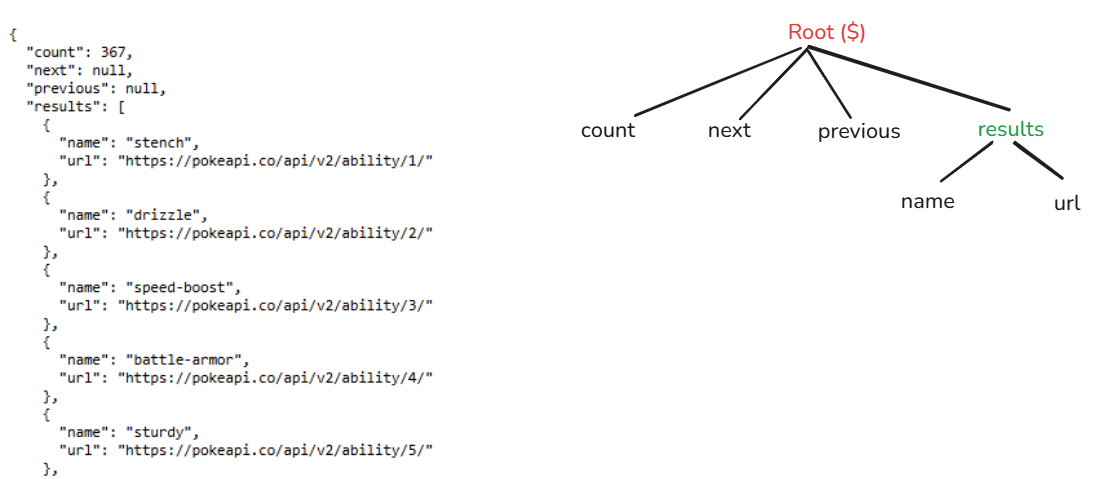
From Fig. 5, you see that from the Root, there are 4 object keys (count, next, previous, and results). In the results, there are many objects (with name and url).
JSONPath is a query language for JSON. If you have worked with XML, you might see the XPath. To know how to use it, I found a page from SmartBear that summarized all the expressions that were used in JSONPath here.
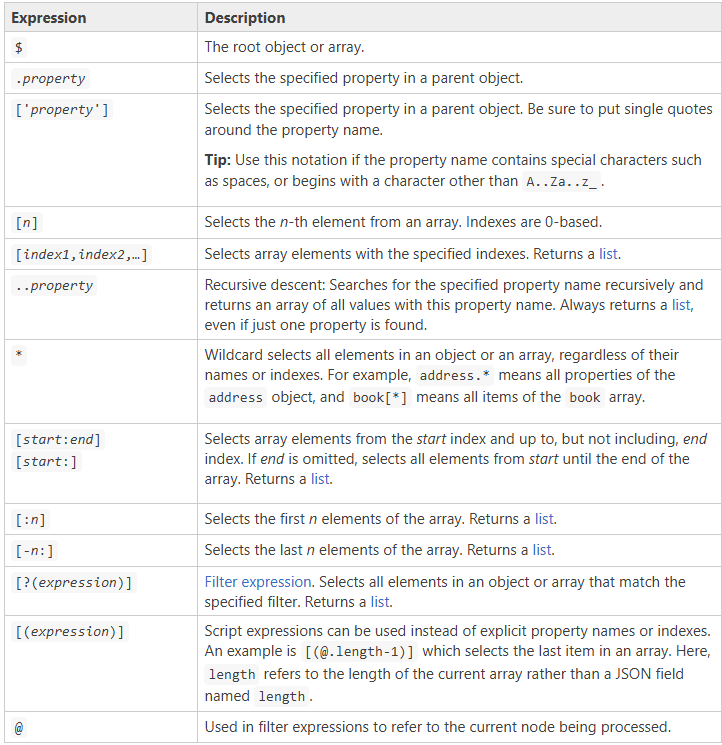
Based on Fig. 6, if I want to get the value 367 from the count key. I will type the JSONPath: $.count
- $ represents the root
- The "." is linked to a parent object named count
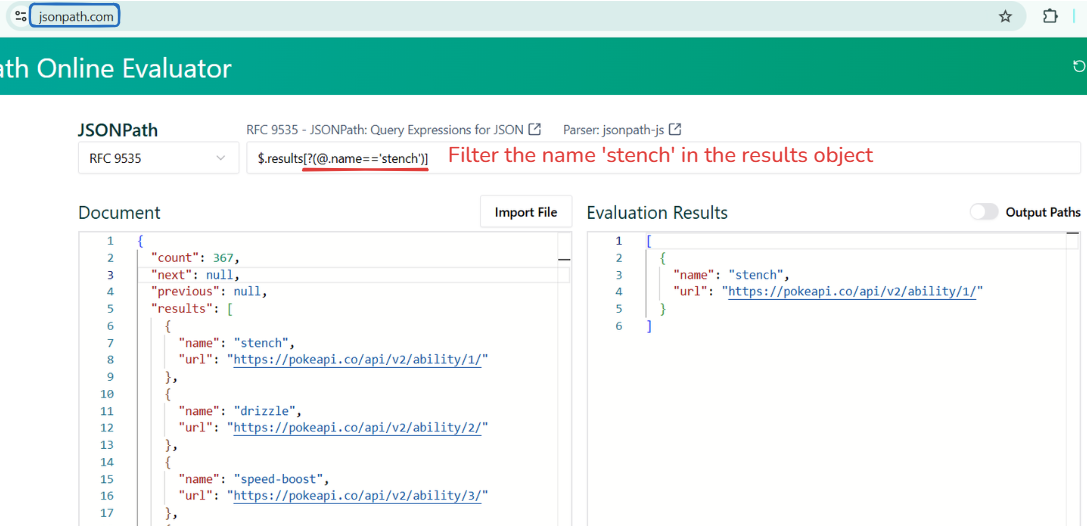
If it's hard to see the result, you can check the result on the page jsonpath.com. In Fig. 7 below, I applied the filter in JSON with [?(expression)] where @ represents the current node. After the results node, the next node is the name, and I want to filter that name.
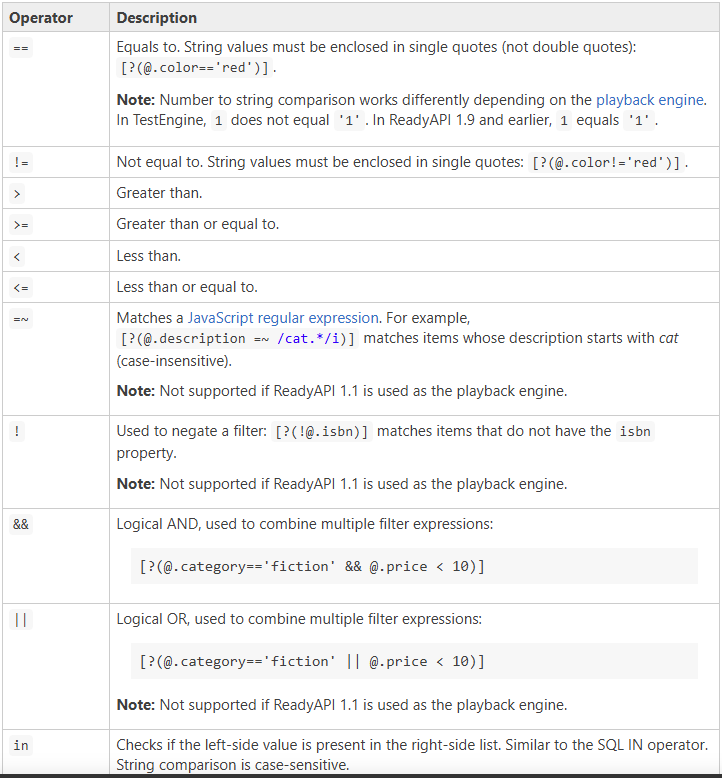
Besides that, there are some operators that you can apply in the JSONPath. You can check the full table here.
I hope it will be helpful to understand JSONPath and how to write it. Next, we will write it in the REST API Connector :)
3/ How to fetch data from an API using the REST API Connector?
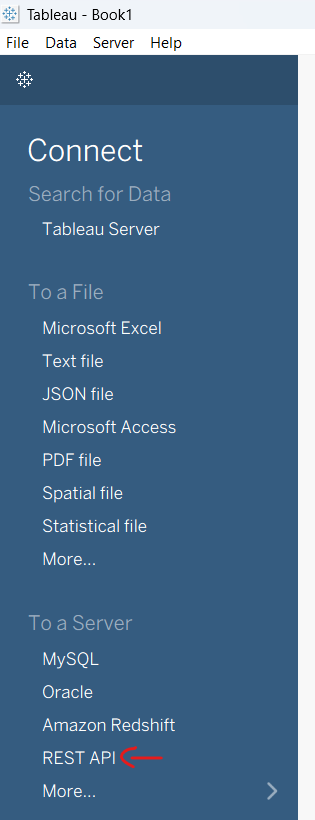
Open Tableau Desktop, in the Connect panel, look at the To a Server section. If you cannot find it, click on the More option below, then search for REST API.
After clicking on the REST API option, a REST API window opens. There are 2 tabs (General and Advanced).
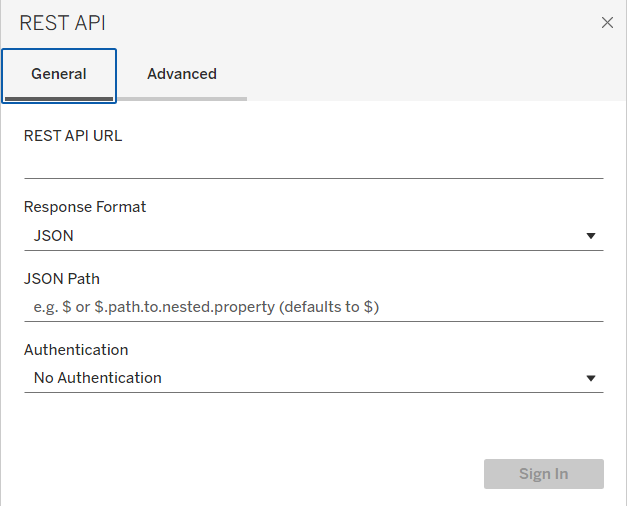
In the General tab, you will see some settings:
- REST API URL: where you put the endpoint url there
- Response Format: There are 2 options for the response format (CSV and JSON)
- JSON Path/ CSV Delimiter: It will show JSON Path if you selected JSON in the Response Format; otherwise, it will show CSV Delimiter. You can filter the response with JSON Path here
- Authentication: You can put the credentials info here for Authentication methods (Username and Password, or Bearer Token, or Oath).
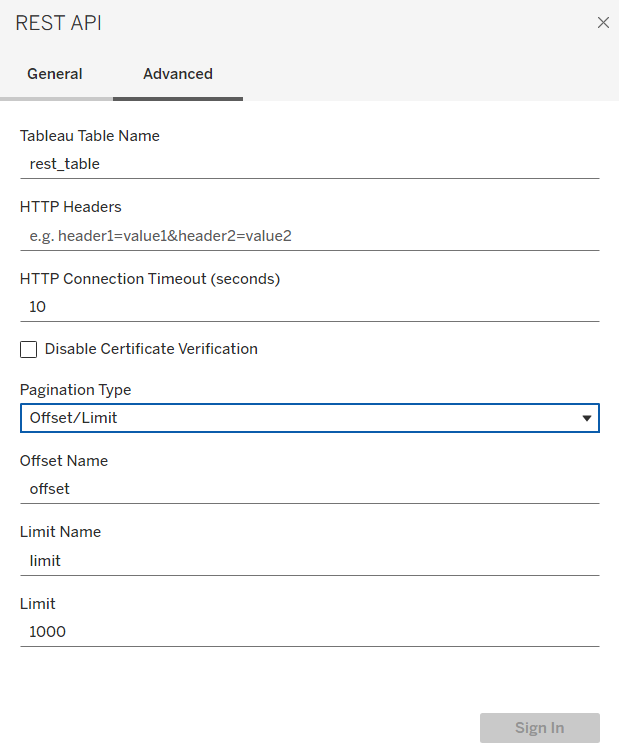
In the Advanced tab, you will see the settings:
- Tableau Table Name: put the name of the table here
- HTTP Headers: You can put the parameters here if you want to filter data, sort, ... (look at the API documentation to use). You can add the filter in the JSONPath to filter the data in section 2 above.
- HTTP Connection TimeOut (seconds): set the timeout in seconds when calling the API
- Pagination Type: You can set the limitation for how many items show on each page
Now, let's try with another endpoint URL: https://pokeapi.co/api/v2/ability/1
Before writing the JSON Path in the General tab, let's analyze the JSON structure a little bit.
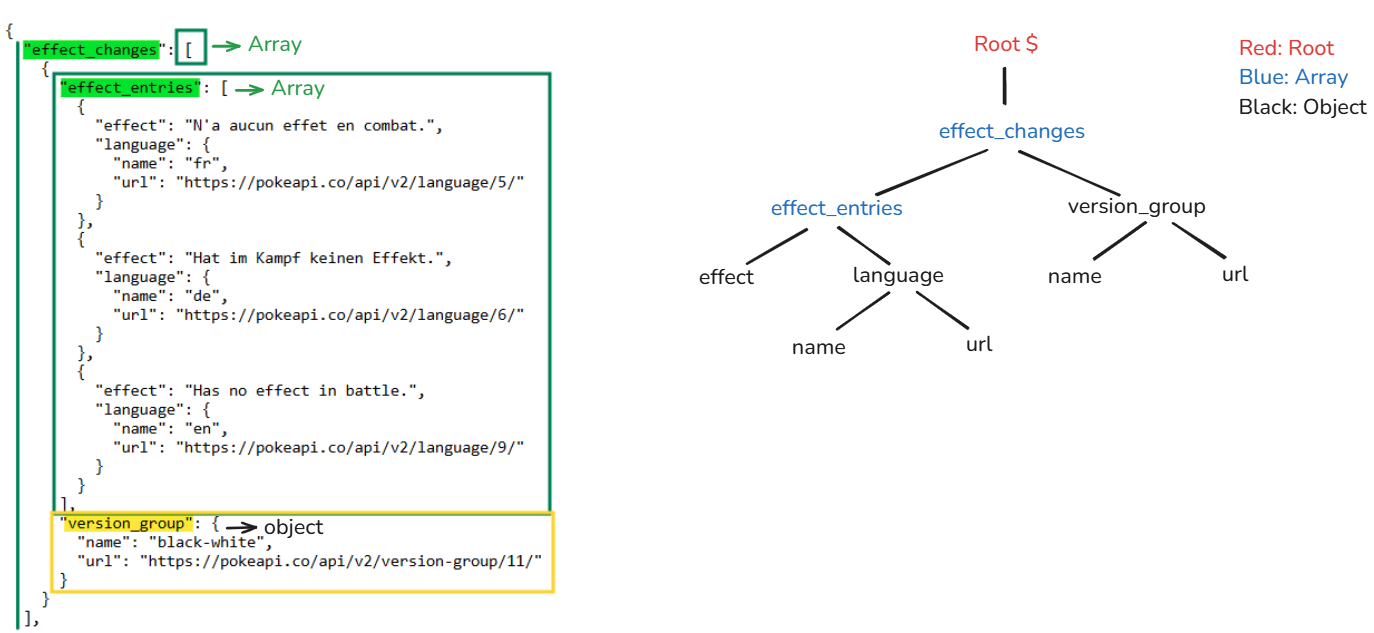
There are many objects and arrays from that URL. I will take the first array (effect_changes) as an example. If you see the square bracket "[" after a key, that's an array. On the other hand, if there's a curly brace "{" after a key, that's an object. Depending on that type, we can write the JSON Path more easily.
From the Root ($) -> effect_changes (array) -> effect_entries (array), version_group (object).
Note: if you see the array and want to fetch all data in that array -> use [*].
If you want to get all data in an object -> use .<key_name>
For example:
effect_changes is an array. If I want to get all data (including effect_entries and version_group) in this array, I will type:
$.effect_changes[*]
For only data in the effect_entries array, from the root -> effect_changes, I skipped it, so I used 2 dots. Because of the array, I use [*].
$..effect_entries[*]
For only the data in version_group, the parent node of version_group is effect_changes, I used another dot for the parent node. So, you see 2 dots at the front of version_group.
$..version_group
I only want the data in the "effect" object in the "effect_entries" array. The "effect" key is an object, not an array, so I didn't use [*]. You can type either:
$..effect_entries[*].effect Or
$..effect
You can use either one of those ways to parse data. However, if the JSON structure is complex and another object includes the "effect" object, implementing the parent nodes in JSON Path would be clearer and safer.
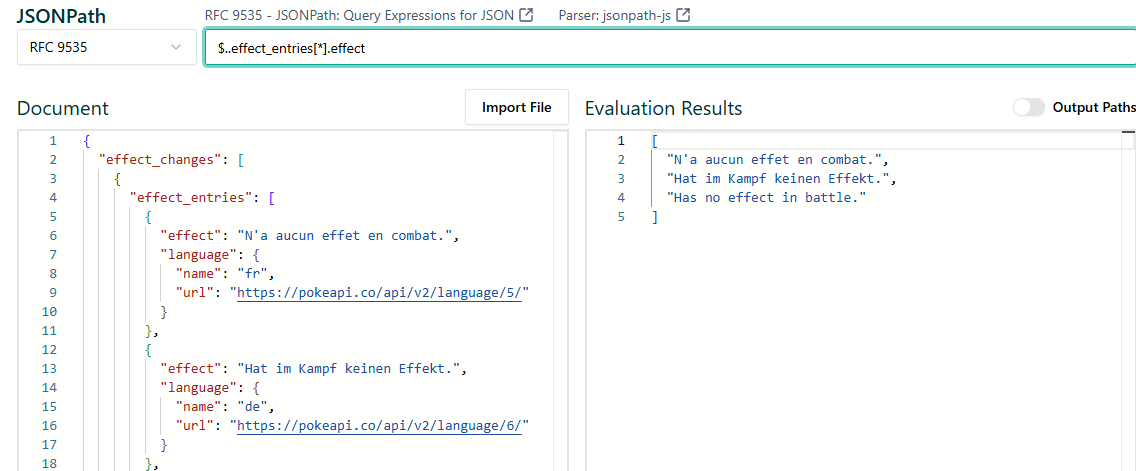
Besides that, you can also apply the filter in the JSON Path. For example, I only want the effect_entries data if the language.name is "fr". I will type:
$.effect_changes[*].effect_entries[?(@.language.name == 'fr')]
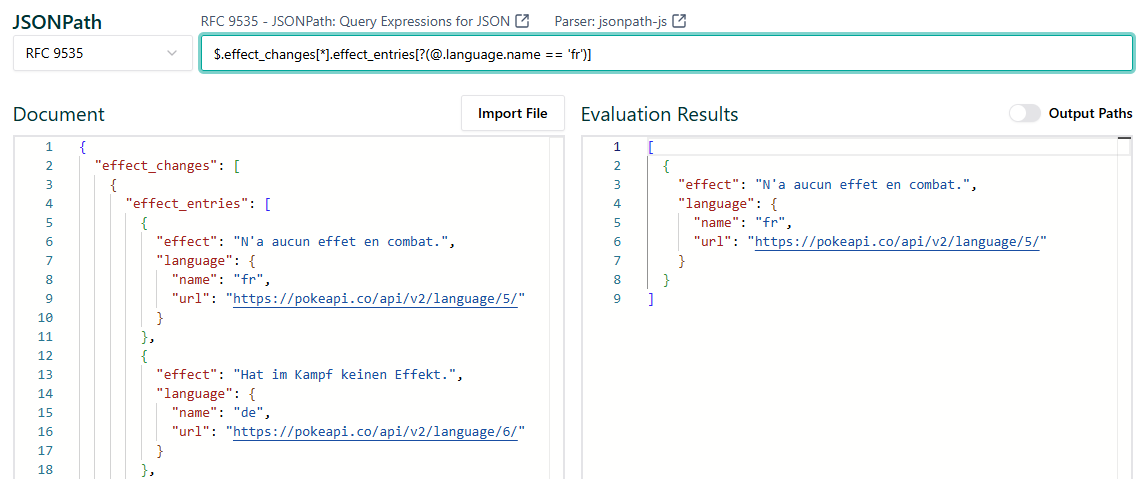
To apply the filter, I will use [?(<expression>)]. Inside the expression, I use "@" to specify that the current node is language -> name. In Fig. 14, you can see that it only outputs the data that satisfies the condition.
How about flattening all nested objects/arrays data in one table in a JSON Path?
As you see from the JSON structure in Fig. 12 above, in the effect_changes, there is one array (effect_entries) and one object (version_group). I want to do a cross join of those 2 output tables into 1 table to get the result as Fig. 15 below.
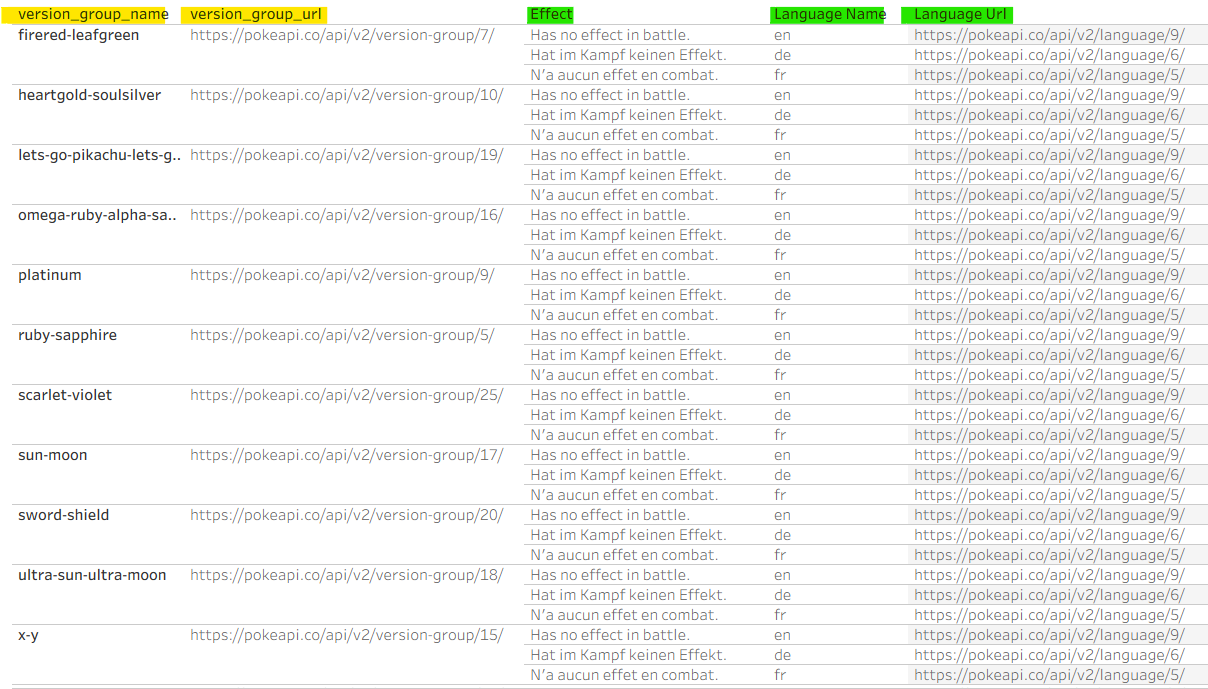
Unfortunately, I couldn't do it in one JSON Path. I have to build each table separately by calling the individual API. Then, if I want to build in one table, I will build a relationship to connect tables together.
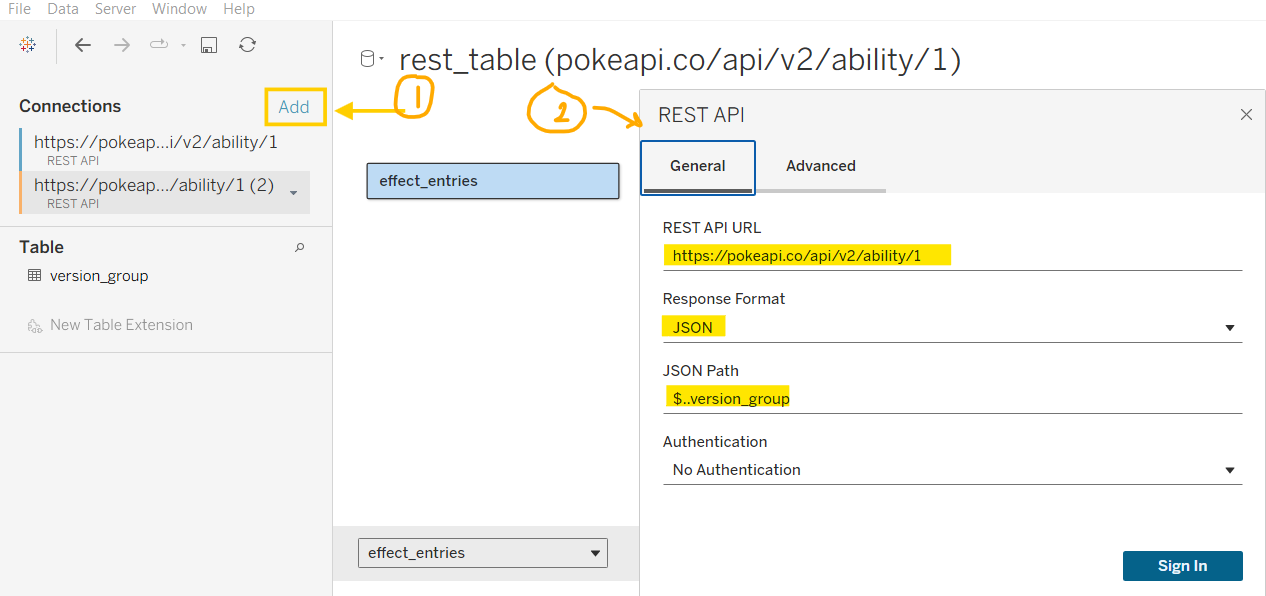
In Tableau Desktop, I will configure the settings in the General tab:
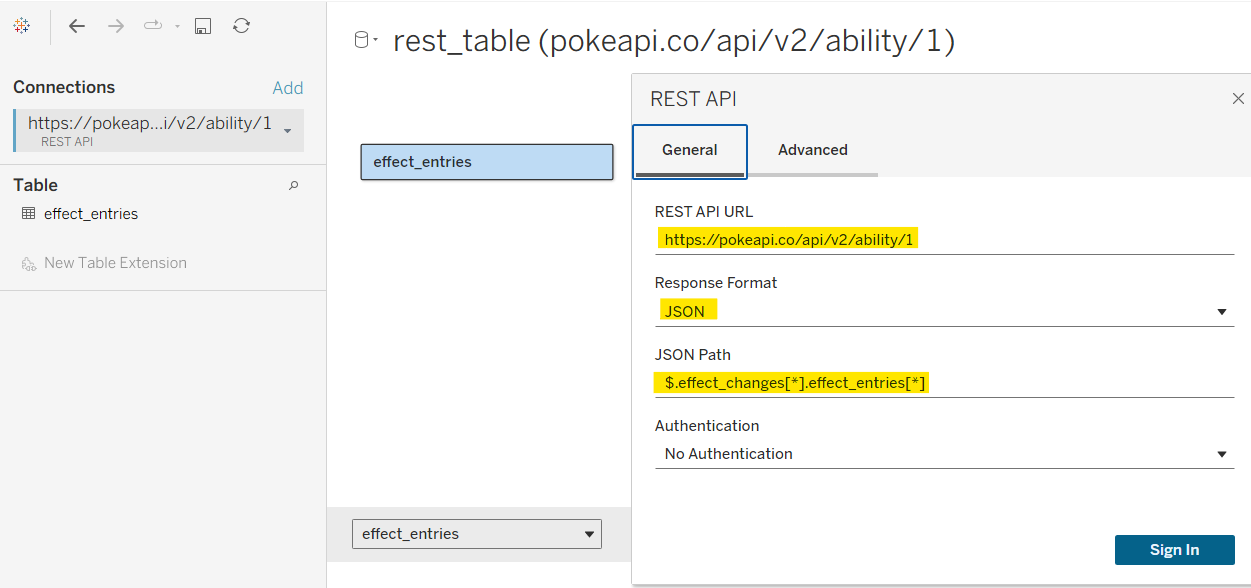
In Fig. 16, I sent a request to the API URL above and get response in JSON format. Then, I want to parse JSON with the JSON Path to get all data in the effect_entries. I didn't set the authentication because it's a free API. In the Advanced tab, I put the name of this table as effect_entries. Then, click on the Sign In button to get the result.
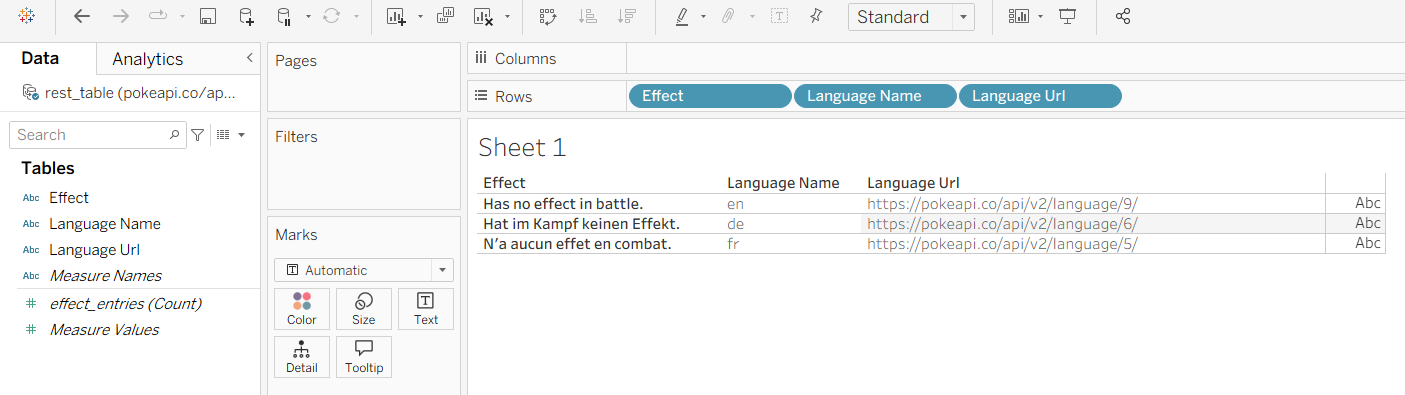
If I drag all fields (Effect, Language Name, Language Url) from the effect_entries table into Rows, all the objects inside the effect_entries array will show up there (Fig. 17).
Next, I want to add the version group to the same view. Back to the data source pane, I added another REST API Connector for version_group.
With the same API URL, the JSON Path is now $..version_group. I also changed the table name to version_group in the Advanced tab (Fig. 18).
Now, I will drag the version_group table to the canvas on the right to connect to the effect_entries table to build a relationship.
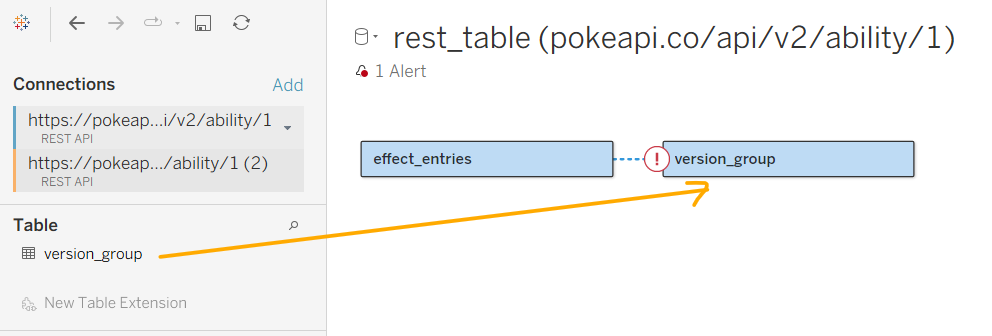
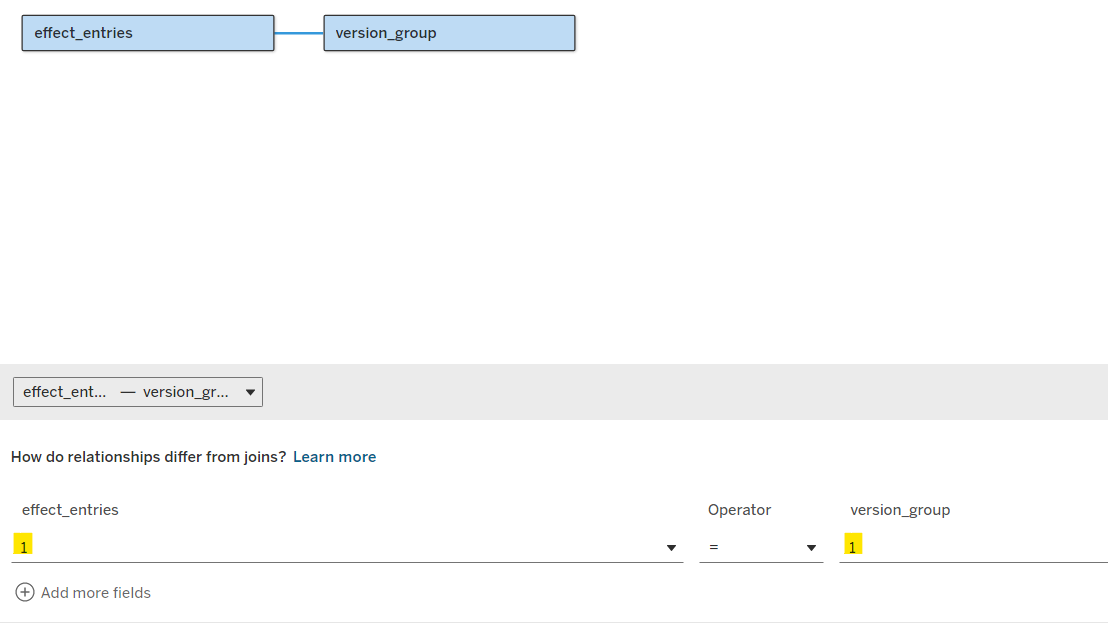
Then, you will see an alert. We will need a field from each table to connect them. As we want to cross-join those 2 tables, I created a new calculation for each table. Then, I put 1 for each to connect. Now, you will see that the alert disappeared (Fig. 20).
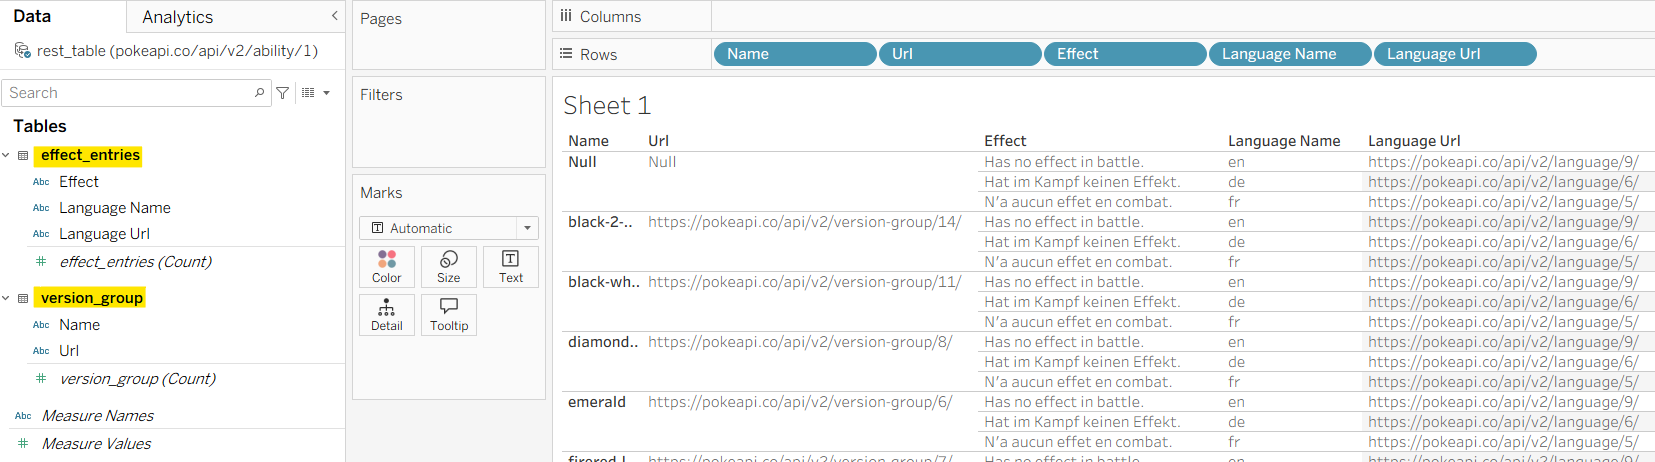
In Sheet 1, you can see 2 tables (effect_entries and version_group). I can drag the column of each table into the view (Fig. 21).
In Tableau Prep Builder, the settings process is the same.
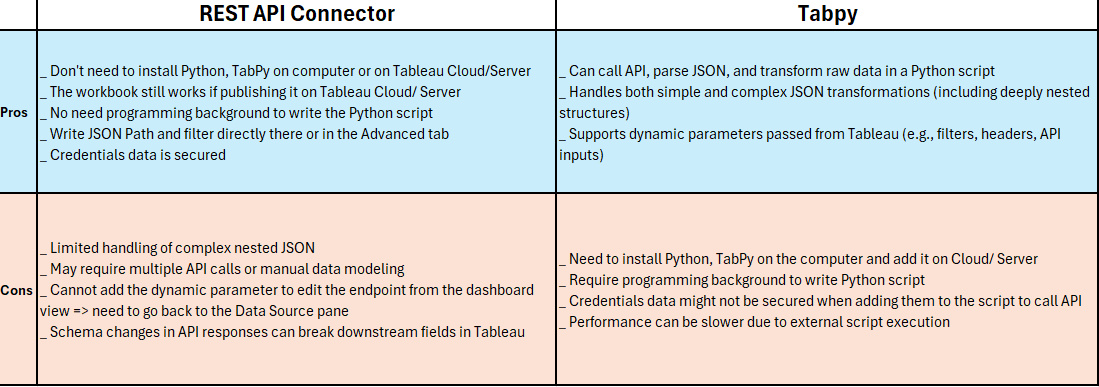
4/ The pros and cons of this tool compared to using TabPy
After testing both approaches, using the REST API Connector and TabPy to call APIs and parse JSON, I summarized my observations in the table below, highlighting the pros and cons of each method.
Overall, the REST API Connector is a game-changer for quickly connecting to APIs and parsing JSON directly within Tableau Desktop, especially for simpler use cases where minimal setup and fast iteration are important.
In this blog, I introduced the REST API Connector, explained what JSON Path is, and demonstrated how to write JSON Path expressions to parse and flatten data. I also walked through how to configure the REST API Connector in Tableau Desktop and how to build relationships between tables. In the final section, I compared the REST API Connector and TabPy to highlight their respective strengths and limitations.
While the REST API Connector can solve many common use cases, it still has some limitations when working with more complex scenarios.
I hope you find this blog helpful when working with APIs in Tableau. Feel free to connect with me on LinkedIn and share your thoughts. I’d love to hear your feedback.
See you in the next blog! ;)