


In my previous blog, I covered the UNION tool and how to blend data using the UNION tool. Another tool that blends data in Alteryx is the JOIN tool. The JOIN tool can combine two inputs based on either common field(s) or based on record position. To combine more than two inputs based on common field(s) or record position, there is a JOIN Multiple tool (which will be covered in a later blog.)

The JOIN tool has two input anchors labeled L and R, respectively. Each input anchor can be connected to one of the anchors, such as how it looks in the image above. The JOIN tool then also has three output anchors, labeled L, J, and R. Any records that do not match the configuration from the dataset connected to the L input anchor are then passed through to the L output anchor. Similarly, any records from the dataset connected to the R input anchor are then passed through to the R output anchor. Records that matched the configuration are then combined and the J output anchor is the resulting dataset.
JOIN By Specific Fields
By default, Alteryx Designer will JOIN by Specific Fields

This option joins the two datasets together when there are one or more fields in common. When there is more than one field in common, it is important to make these matches in order to reduce errors in joining this data. The order in which we list these common fields does not affect the data as long as the fields are matched correctly.
Let’s see an example!


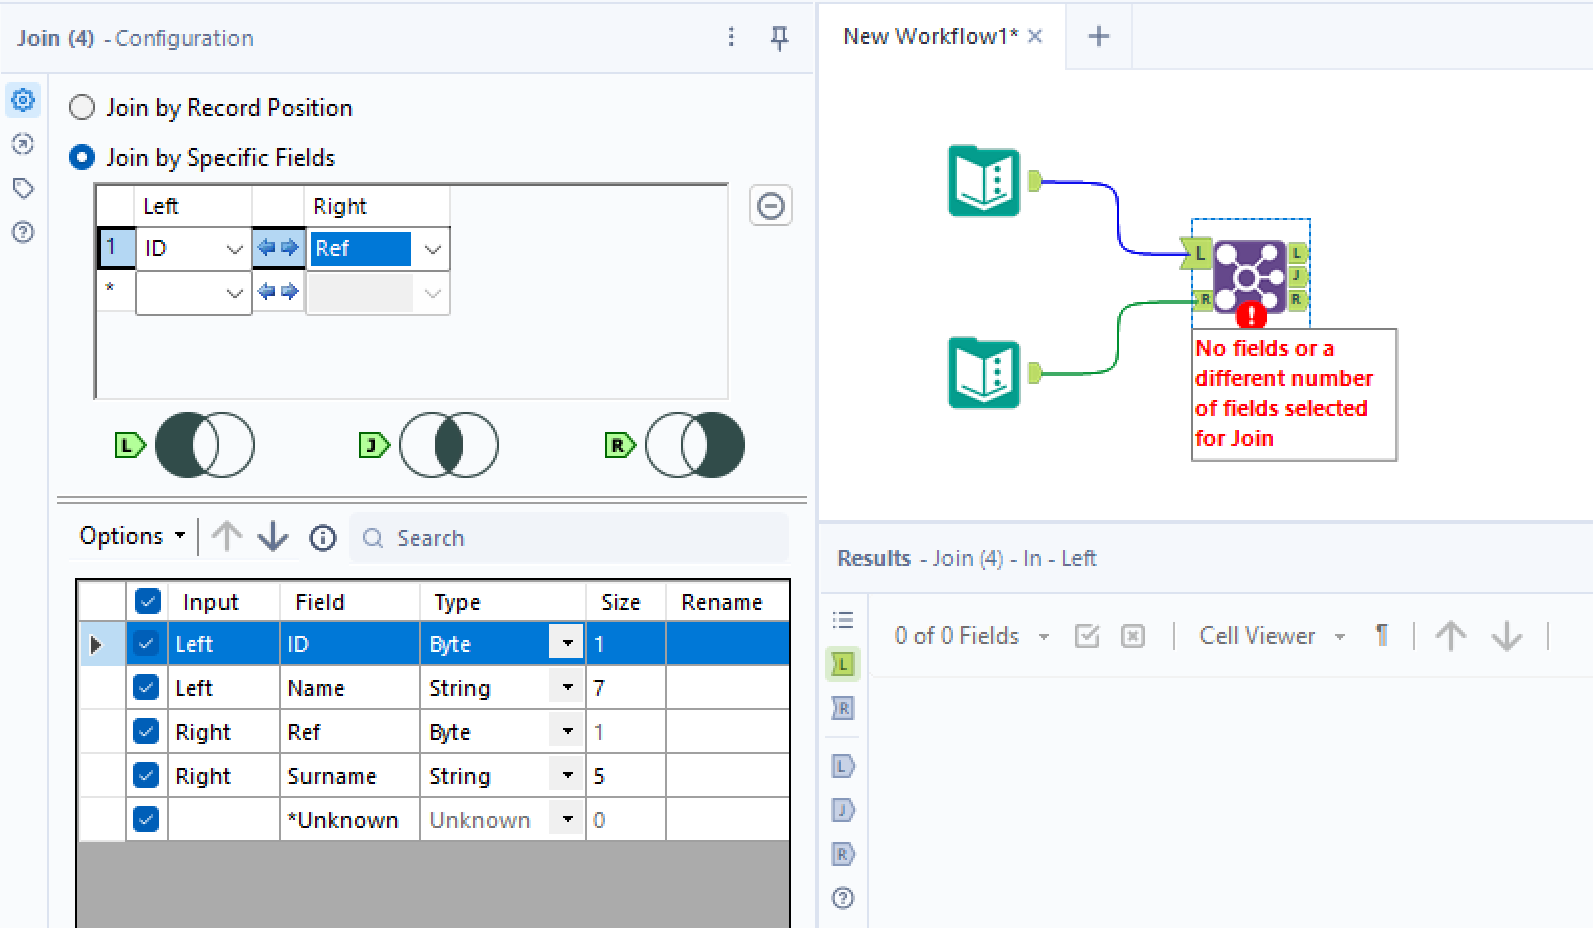
In this example, we can see that the ID column in the first table and the Ref column in the second table match. Despite the mismatched names, we can still choose to join by these two specific fields. If the field names matched, when we selected the field for Left, Alteryx Designer would have automatically populated the field under Right. However, this can also cause issues if fields with the same name contain different data, so make sure to still double check the fields you have selected!
In the Configuration window, Alteryx Designer also provides a visual representation of what the three output anchors of the JOIN tool will look like:

The L anchor contains all the records from the L input that did not join to records from the R Output.

The J anchor, which is an Inner Join, contains records that joined from the L input to records from the R input.

The R anchor contains all records from the R input that did not join to records from the L Input.

JOIN By Record Position
Joining two tables by record position works best when the two tables have the same schema or structure.
To better demonstrate the differences between JOIN by Specific Fields and JOIN by Record Position, I added two additional rows in the middle of the table connected to the L input anchor:

Please keep in mind that there are now 7 rows of data.
The table for the R anchor remains the same and still has only 5 rows of data:

Connect the two fields to the JOIN tool and choose to JOIN by Record Position:

Notice how we can no longer select which fields from the Left and Right to connect on and the dropdowns are grayed out.
From there, we hit RUN:
The two columns that did not match record position is then pulled through the L output anchor:

Despite the table connected to the L anchor containing 7 rows, only 5 records are displayed in the J output anchor.

If we look at the Ref and ID column, we can see that there are some mismatched records, however, because we chose to JOIN by record position, Alteryx Designer ignores the values and matches on;y based on position. In such a small dataset, it’s easier to spot the differences and see that there is an error. Such an error will be harder to spot when joining larger datasets, so remember to keep in mind how you want to join the data!
Embedded Select
In a previous blog talking about the Select tool, I mentioned that embedded Select tools existed within certain tools such as the JOIN tool. This allows you to select and deselect fields that you do not want to include in your Inner Join.
Let’s say in this example, I see that ID from the Left table and Ref in the Right table are redundant and I want to remove Ref, I can do so in the Configuration window:


I can also rename the field ID to RefID and change the data type from Byte to V_WString:

The changes are highlighted in yellow, same as when making changes in the Select tool.
Additional Notes:
Although we can make changes to field names and data types in the JOIN tool, these changes only affect the output of the data. Any changes that need to be made prior to the JOIN will need to be done prior to configuration in the JOIN tool.
An additional note to keep in mind is that the JOIN tool only allows for fields from the Left and Right anchors to be joined if they have matching data types. For example, string fields can only be joined to string fields, numeric fields to numeric fields, boolean fields to boolean fields, and so on and so forth. This is why changes to the data type must be done prior to the JOIN tool.
In order to perform other JOINs such as a Left Outer Join, Right Outer Join, or Full Outer Join, the JOIN tool will need to work in conjunction with a UNION tool to produce the desired output. A blog on this will be out soon. Until then, I hope this helped you better understand the JOIN tool. As always, thank you for reading and let’s analyze away!