


We're back! This time going through how to complete joins in the three data preparation platforms that we learn during training at the Data School. If you weren't aware, this is part of a 'Back to Basics' series that I'm doing on fundamental steps that might be needed in data preparation, compared across the software mentioned above. So far I've covered generating rows, filling down and ranking but it's likely that I'll add to the series after I've written this blog post too so if you're interested, head to my profile where you can check out all of my posts (this is not supposed to be a self-plug although I'm aware that's how it looks. To be completely transparent, I gain no benefit from you reading my blogs, just trying to help a fellow data prepper out! I wanted to add a #NotASponsoredAd but wasn't sure if it would be seen as cringeworthy - please understand I mean it ironically). Now we're all joined on the background of this blog (a bit of a stretch on the join pun, I'm sorry), let's learn more about joins themselves.
Understanding Joins
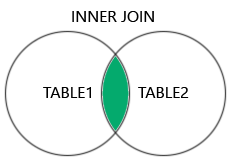
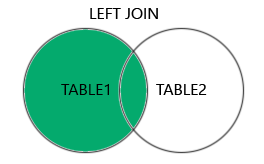
There are numerous types of joins that you can perform depending on the data that you have and what you're planning to do with it. The key ones that we'll be exploring today are inner joins, left joins (you can figure out how to do right joins from there), left joins excluding the inner join, full joins and cross joins. Does the word join also look strange to you now that it's been said too many times in the last sentence? You can find a visual representation of each of these joins using Venn diagrams a few paragraphs down, alongside examples of when they might be used.
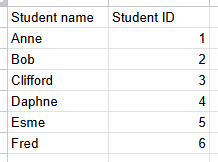
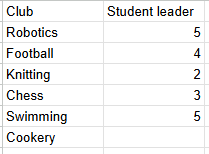
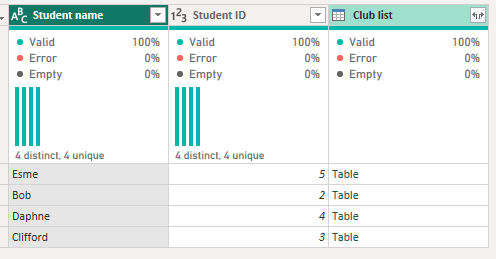
The data that we'll be using today to explore the different types of join is about fictional students and the clubs they can participate in, as well as the students that lead them. The student list acts as a lookup table for the club list so student ID (from the student table) = student leader (from the club table). Below you can see the tables that I mocked up and a description of each of the joins and how they work in this scenario.
Inner Join
An inner join looks at where the rows of data in both tables match on a common field. In this example, perhaps you'd like to see which clubs are led by which students. The inner join will result in a table which only shows clubs with a student leader (so cookery will be excluded) and only students who lead a club (so Fred and Anne will be excluded).
Left Join
A left join returns all of the rows from the left-hand table and the rows in the right hand table that share a matching value with the left table. In this example, perhaps you'd like to see the clubs and their student leaders but also the students who don't lead any clubs. Therefore, all of the students will be output in the results but only clubs with a student leader matching a student ID will also be fed through (so cookery again gets excluded). Students who aren't a leader (Anne and Fred) are included but their corresponding fields show as null.
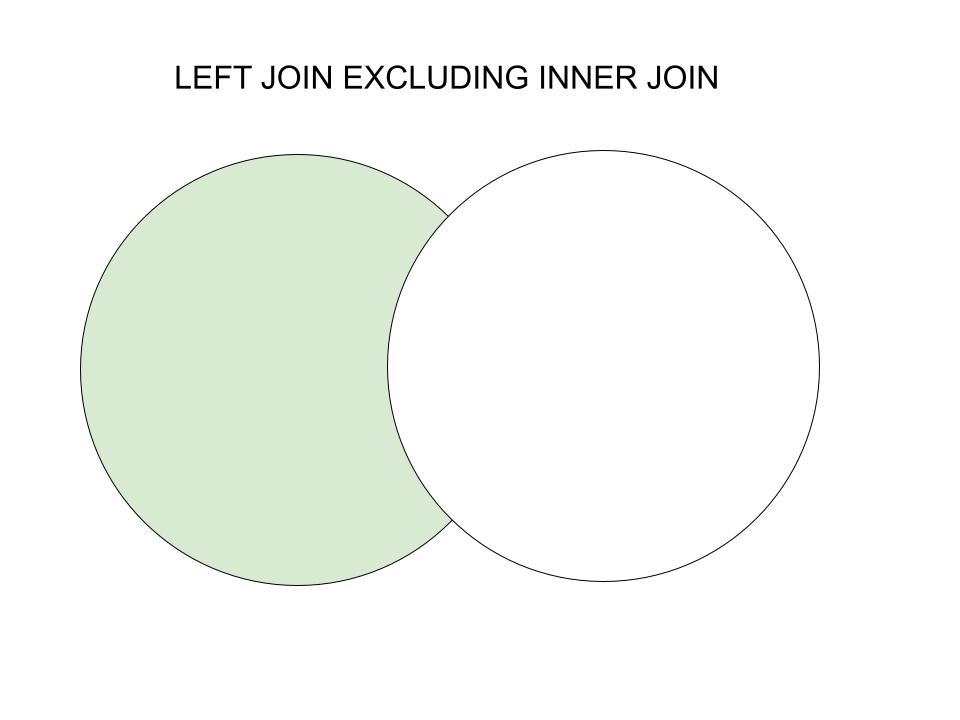
Left Join excluding Inner Join
A left join excluding the inner join returns all of the rows in the left-hand table which don't share matching values with the right-hand table. In this example, perhaps you'd like to see which students don't lead any clubs. Thus, only Anne and Fred's details are outputted because all of the other students lead a club and therefore have a matching value within the club table.
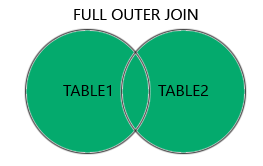
Full Outer Join
A full outer join outputs all of the rows in both tables. It joins the data so that rows with matching values are connected but rows which don't have a matching value in the other table are still fed through, but their values in the corresponding columns are null. In this example, perhaps you'd like to see the students and their associated clubs that they lead but you'd also like to see students who don't lead any clubs and clubs without leaders. In the results, all of the students except Anne and Fred will be fed through and matched with their corresponding row in the club list. Then Anne and Fred will have matching null values for the club columns and cookery will have null values for the student columns.
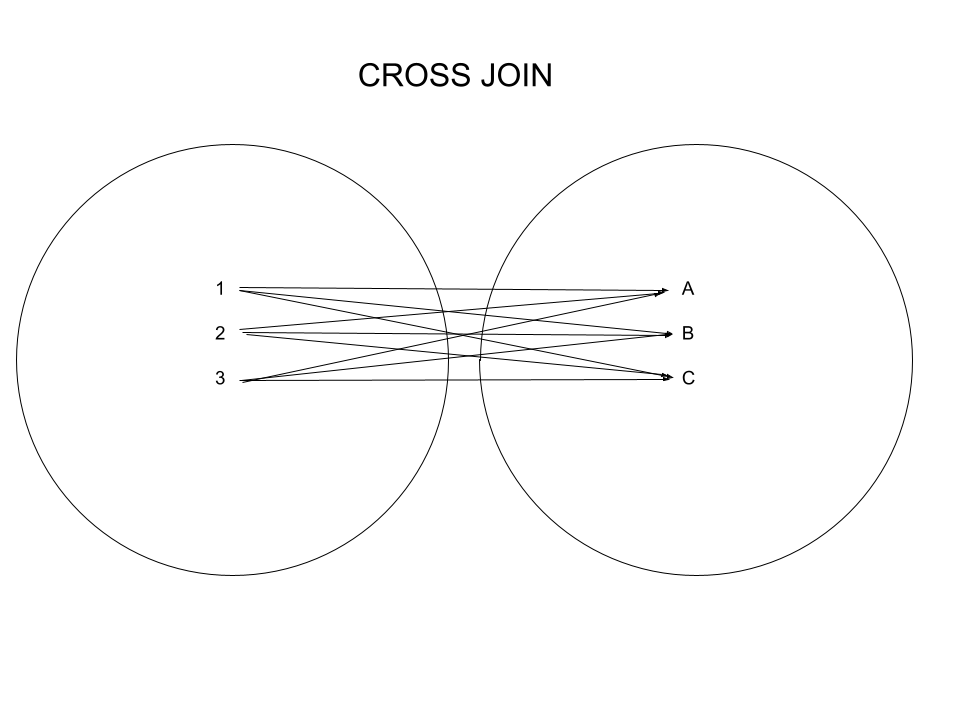
Cross Join
A cross join matches all of the rows in the first table with all of the rows in the second table. In this example, perhaps all of the students participate in all of the clubs and a register is needed to be created for each club (this is tenuous at best but it explains the idea!). The number of rows in the table will explode with all 6 clubs matched to each of the 6 students (e.g. There will be a row for each club matched with Anne, and a row for each club matched with Bob...).
Now that we have a better idea of what's going on in each of the joins. Let's actually learn how to complete them in each platform, starting with a classic: Tableau Prep.
Tableau Prep
Joins in Tableau Prep take place within a join step. You need to load your tables into the canvas before then adding them in a join by dragging one table on top of the other.
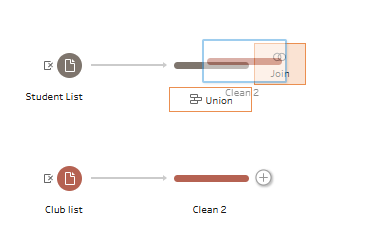
Inner Join
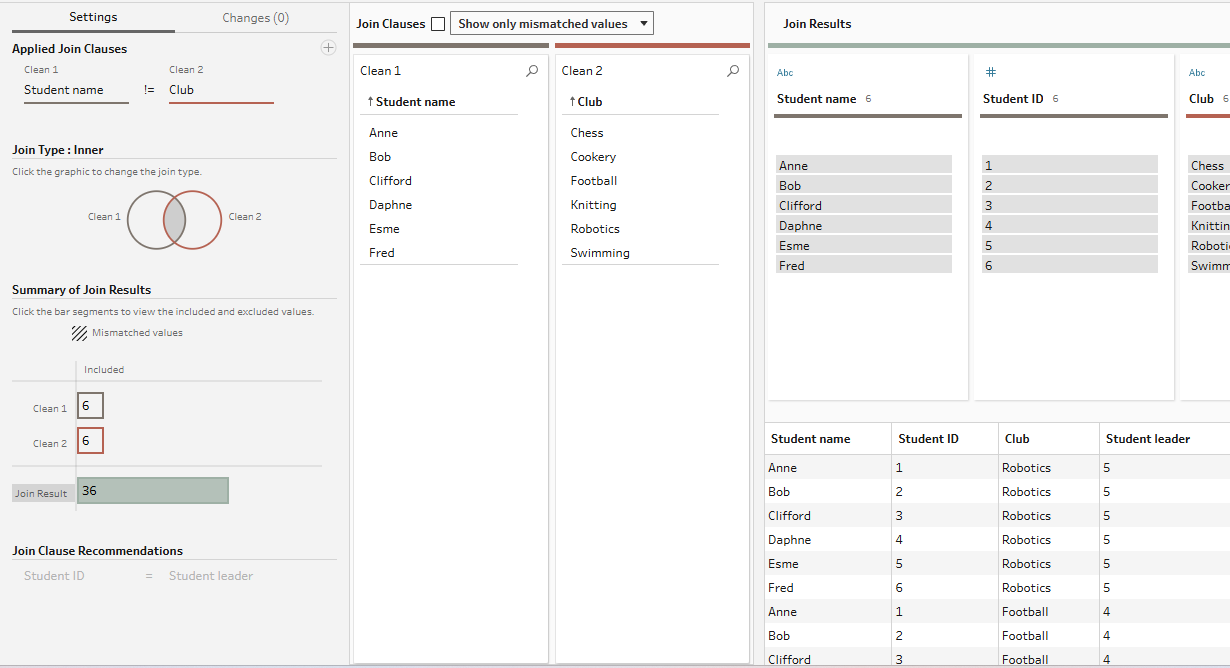
The most simple of the joins in Tableau Prep. All you have to do is set your matching fields as equal to one another in the join clause. If you're lucky, Tableau Prep might already have done the work for you. Although be careful here because sometimes Tableau Prep does match fields that shouldn't be matched! If you want to add another join clause (not appropriate in this instance but if there was a year group that needed to be matched to the student leader as well for example), just click the plus button in the right hand corner of the settings pane.
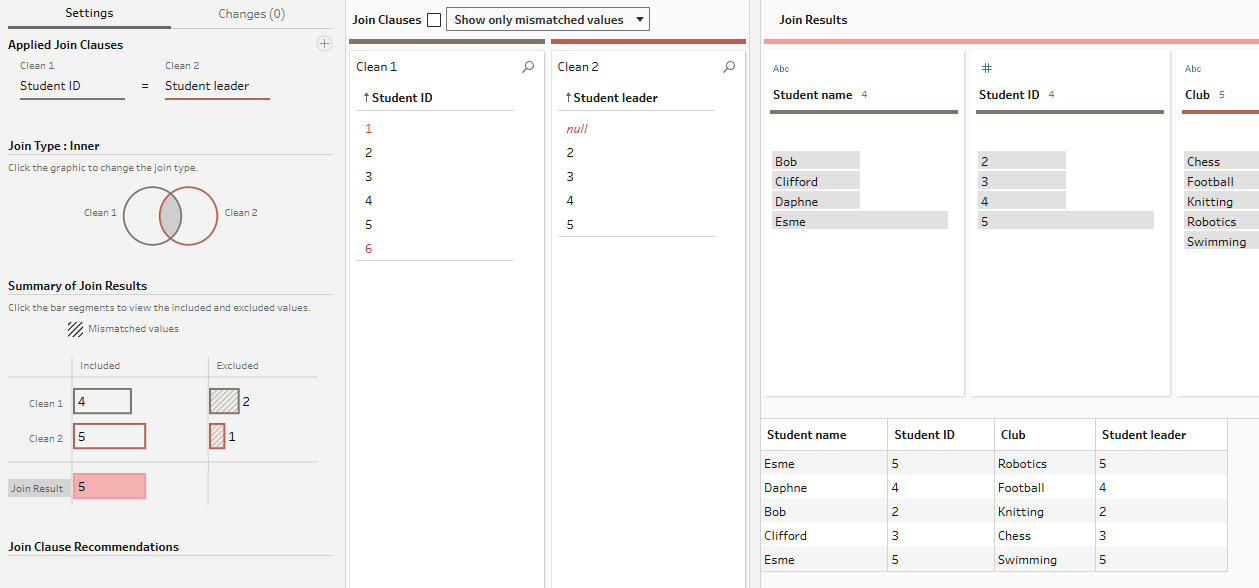
As you can see in the right hand results pane, 5 rows have been produced for the 5 clubs with student leaders, with Esme coming up twice because she leads two clubs. 2 records from the student table and 1 row from the club table have been excluded as neither have a matching field value in the converse table.
Left Join
Simply click the left hand circle in the Venn diagram to change the join to a left join. The circle will fill out and the join type will change, as seen below.
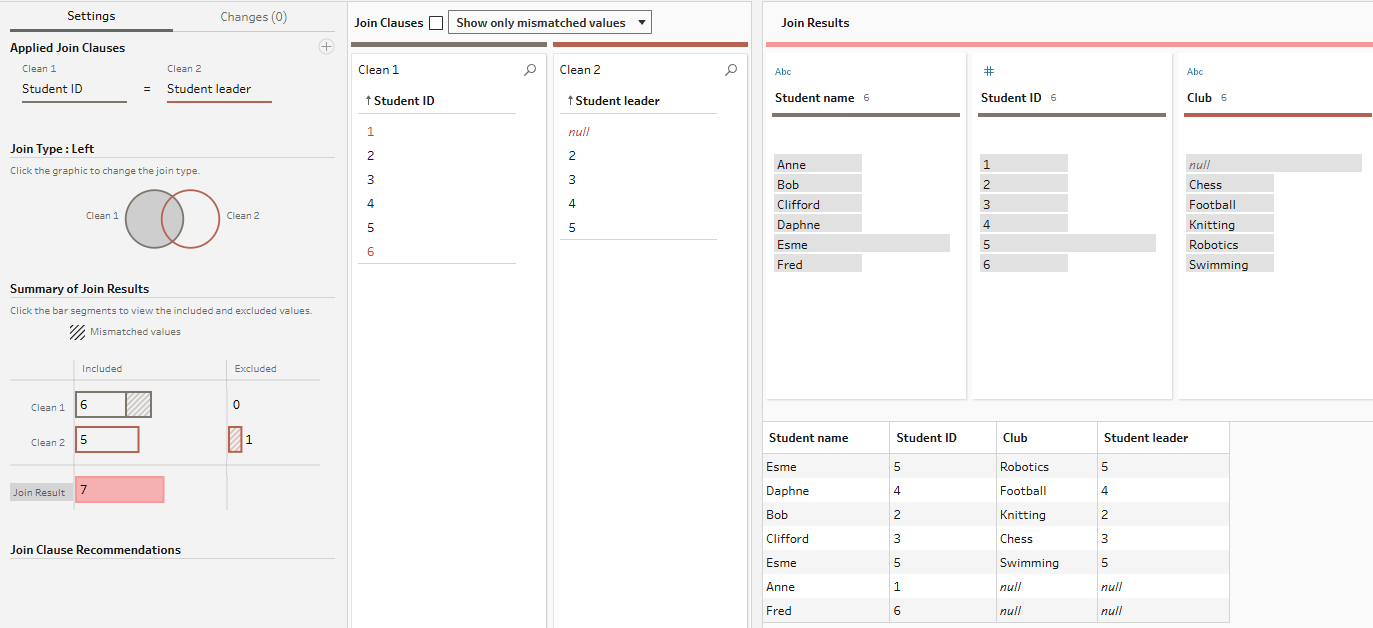
As you can see, 7 rows have now been outputted with the same rows as before, plus the two rows for Anne and Fred which didn't share a matching value with the club table. These unmatched rows are represented by the dashed area of the included rows.
Left Join excluding Inner Join
Click the middle overlapping section of the Venn diagram to remove it from the joined output.
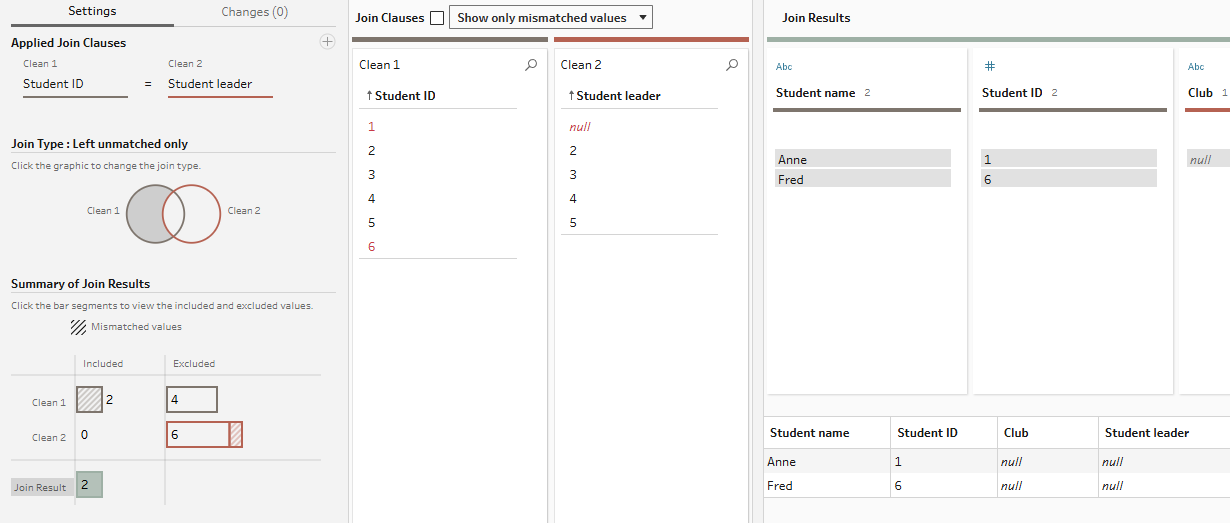
Now only two rows have been outputted, the two from the left-hand student table which don't have any club matches.
Full Outer Join
You probably have the swing of things by now. Click all of the sections of the Venn diagram for a full join.
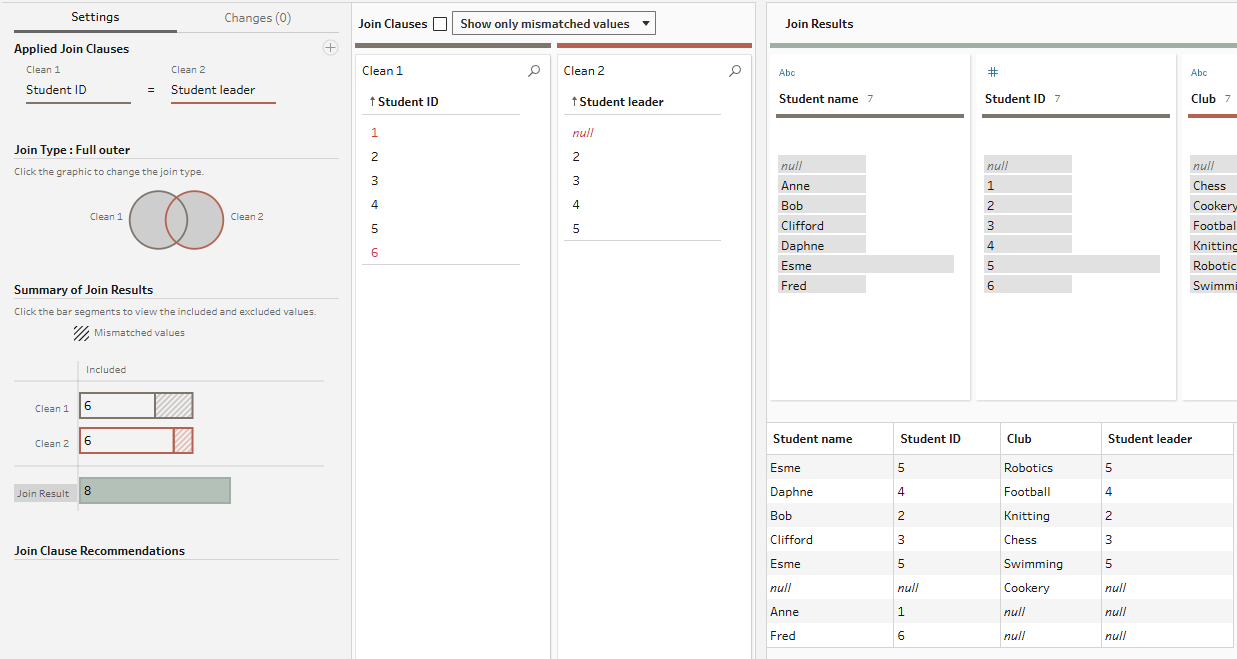
You'll now have 8 records. This includes the 5 rows for clubs with their students leaders. The single row for cookery which has no leader and the two rows for the students who aren't leaders.
Cross Join
Now click the sections of the Venn diagram for your cross join... hang on a second, which sections are those? There are two ways that you can overcome this. I'll show you my hacky sort of way (which does work well but plays a little bit more of a risk as you'll see) and then the more proper and serious way.
So, for a cross join, as you typically want two unrelated tables to combine, you need to find a way to somehow relate them. For my method, these tables are related by setting one field not equal to another field in the join clause (click on the equals symbol to change the symbol in use). Student name is never the same as the club so each row of the student table can be joined with each row of the club table because they meet the join condition of not being equal to each other.
The slightly risky element here is what if a student name was equal to a club? Perhaps you've got a really vain student who named the club after themself, then everything would be thrown off. You can tell in this instance that this is not the case (and could fact check yourself on a larger dataset too) by multiplying the number of rows in your student table and the number of rows in your club table to obtain the number of rows in the join table (e.g. 6 x 6 = 36). But how would you overcome this otherwise? By doing the serious, less fun method that you should probably actually use.
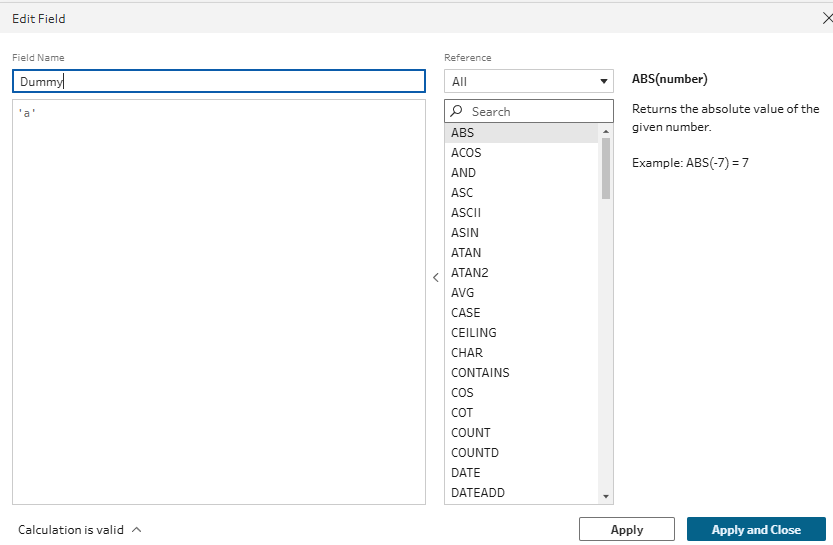
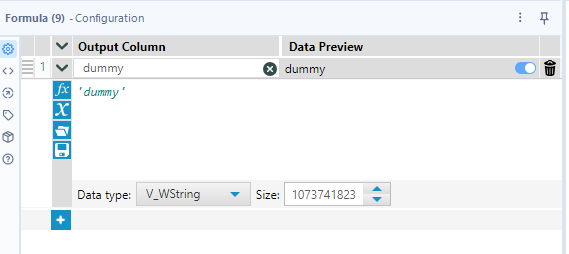
Instead of finding a way to relate the tables by seeing how they don't relate and reversing that, kind of like I did above, you can force a relationship between the two tables instead. Do this by creating a calculated field in each of the tables in the previous steps. The dummy variable below is now assigned to every row of the student table and you can do the same for the class table as well.
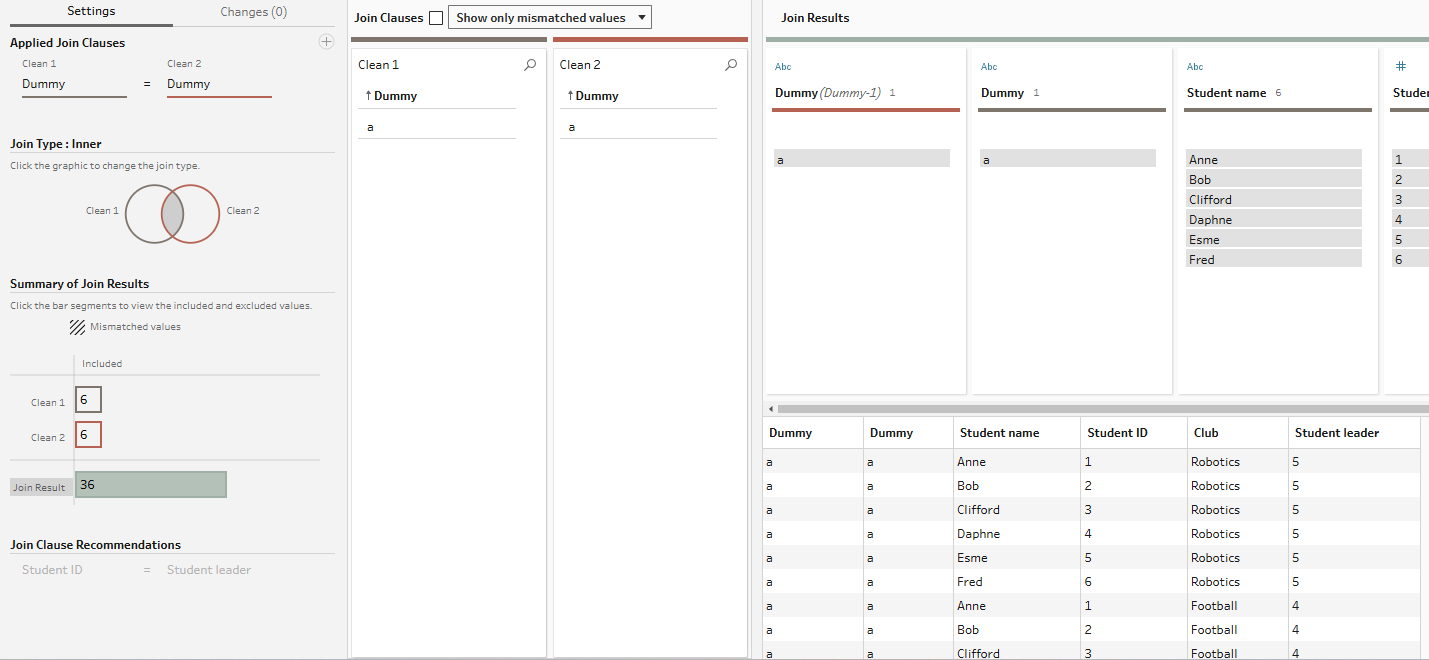
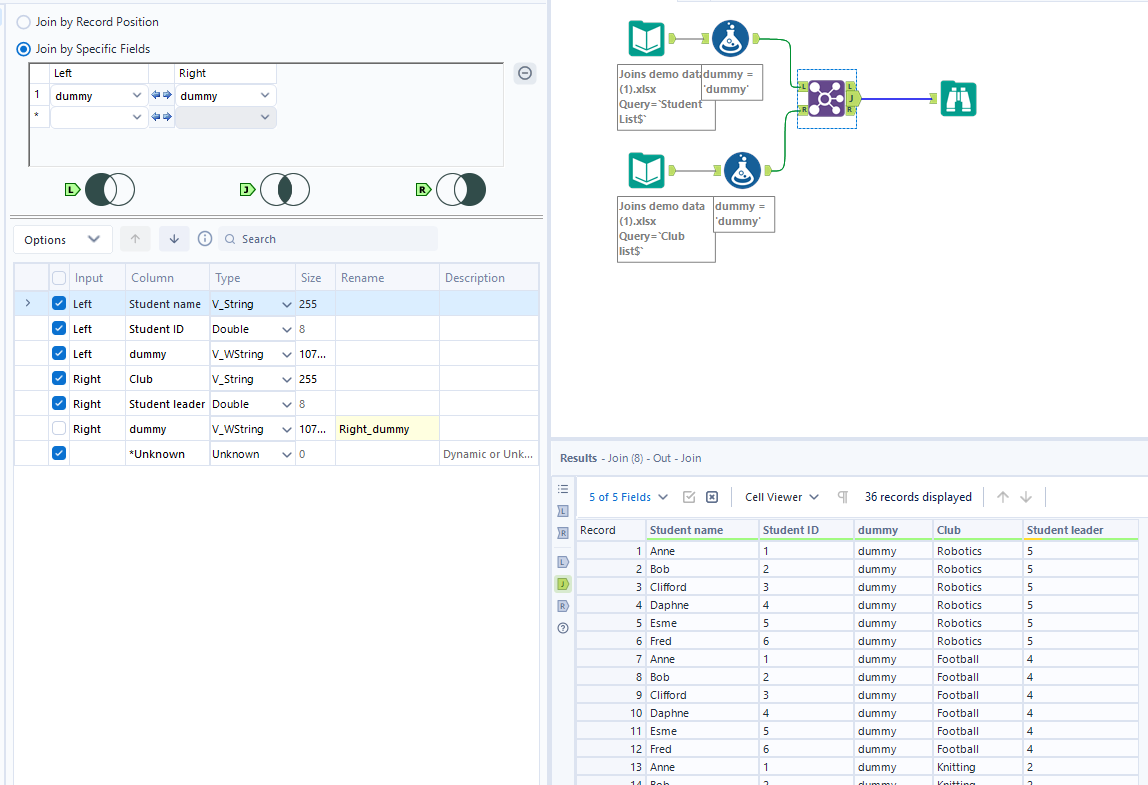
To set up the cross join, then create a join clause where the dummy variable in the student table is equal to the dummy variable in the club table. As a dummy variable is associated with each row in each table, each row in each table will then have a common matching value that they can then join on. Simply remove the dummy variables columns in a clean step, and there you have your cross join!
The final learning tip which I leave you with for joins in Tableau Prep is actually quite a big one. If you hadn't noticed already, which is understandable because I feel like I didn't realise this for an age, Tableau Prep colours the tables and joins and carries this through the join process. The colours that Tableau Prep has chosen for this specific join example are a little ugly unfortunately but the idea still holds! You can see from my initial drag to join image that the student list is grey and the club list is brown in the canvas. These can then be seen in the settings pane of the join with numbers of records coloured, and the newly joined table that is formed shows as pink (in the more recent screenshots, it's a different grey as I'm completing it in a different step but don't worry about that, the premise still holds). You can then see the appropriate colours running along the top of the join clauses pane and the new pink ribbon running along the top of the join results, with the colours of the table that each column came from also represented. Pretty cool and very helpful visually, don't you think?
Alteryx
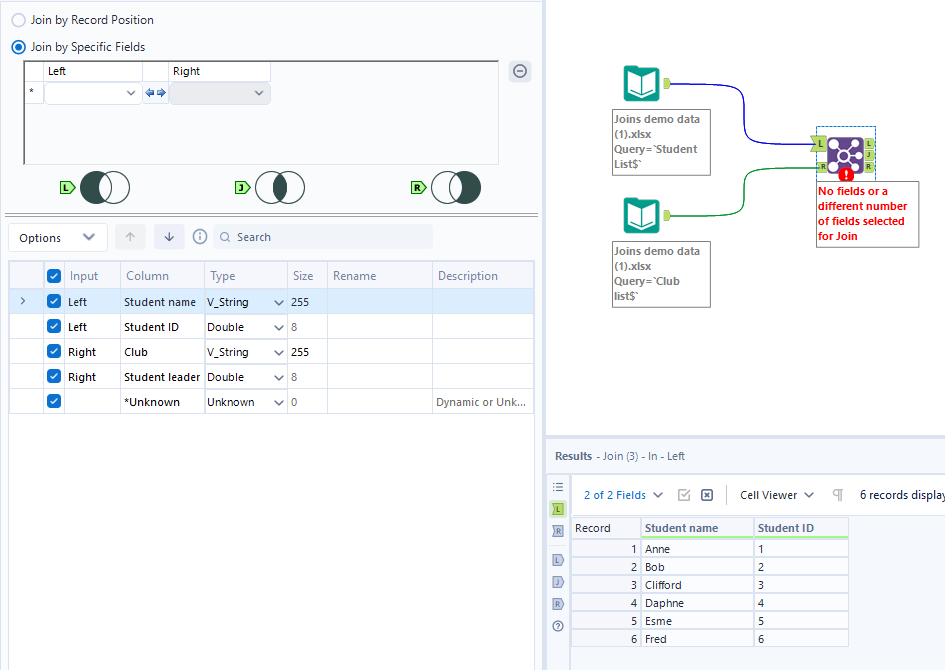
Joins take place by using a join tool in Alteryx. As ever, start by loading your data in using two input data tools. Then add your join tool and link each table to an input connector. You have a similar set-up to in Tableau Prep with the Venn diagram images.
Inner Join
To perform a quick inner join, simply set your two fields in the matching section. Run the workflow and select the J output of the join tool to see your results (plus connect any further steps to this specific J connector).
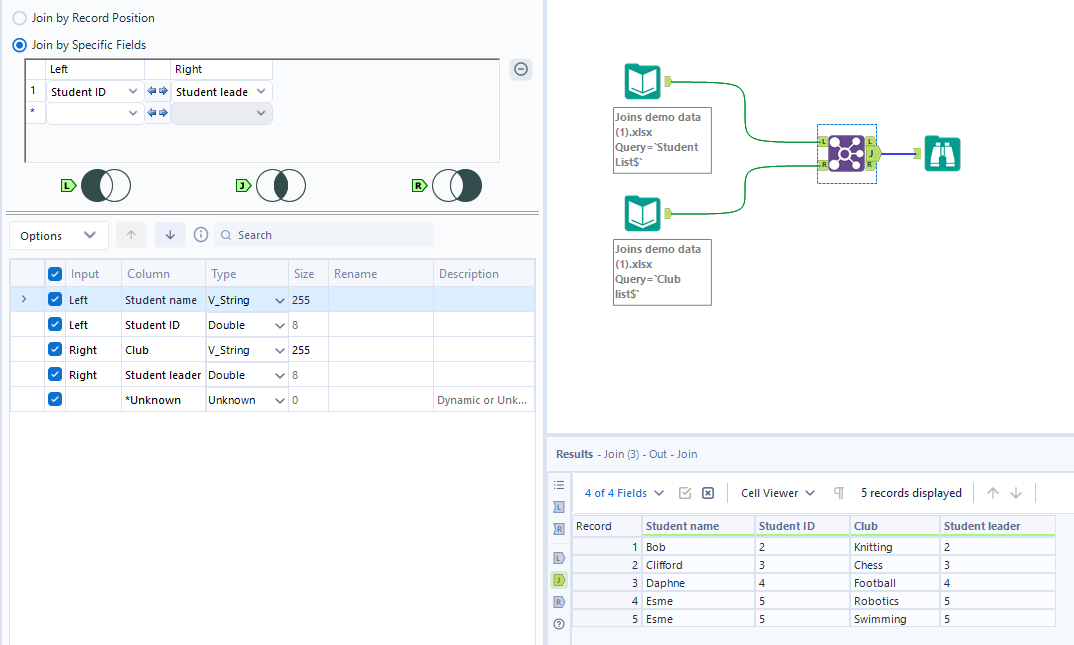
As expected, you have the 5 rows of clubs with their matching student leaders. Students who don't lead and clubs without leaders have been excluded.
Left Join
This one is a bit more complicated than the simplicity of Tableau Prep which is a bit of a shame. Nevertheless, we persevere! To perform a left join in Alteryx, you need to combine the two parts of the Venn diagram that you see are outputted from the connectors in the configuration pane. You can combine these using a union.
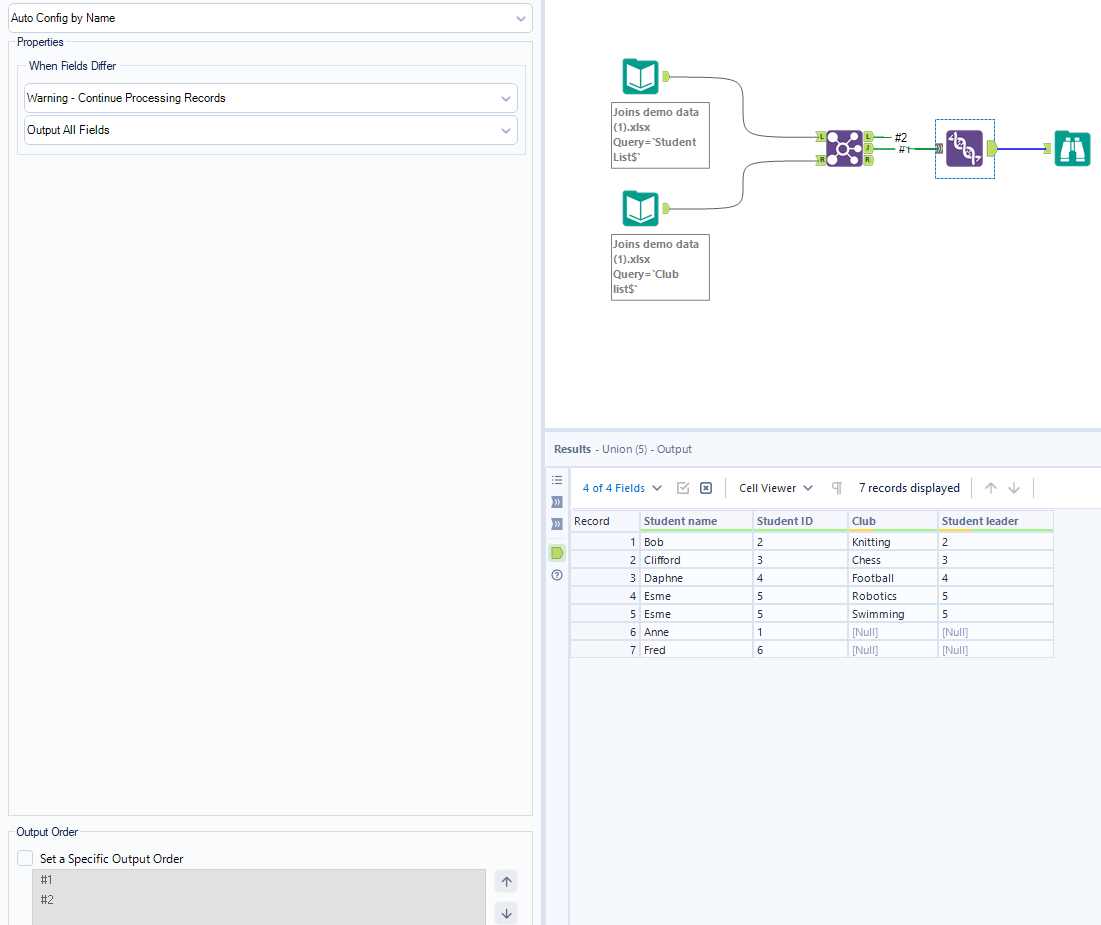
I feel like whilst the act of making the left join is a bit of a faff, it breaks the process down in a sensible manner. With a left join, you are combining both the matching records and the records which didn't match in the left hand table (it's the left hand table because it's input in the L connector, even if they are vertically aligned!). Thus, the union makes logical sense even if it creates an extra step for you.
Left Join excluding Inner Join
Whilst the left outer join is more complicated, this particular type of left join harks back to the ease of the inner join because the necessary output can be found in the output L connector, as you'll recognise from the Venn diagram images.
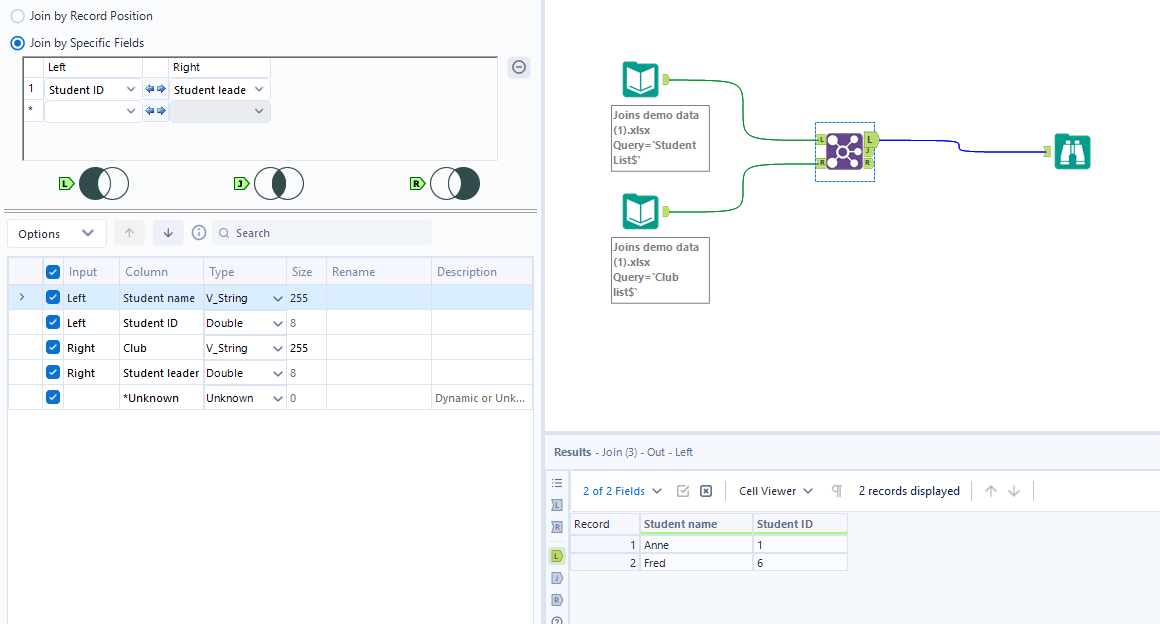
The distinction here is that whilst in Tableau Prep, the columns which the records don't match to (i.e. club and student leader) are fed through as nulls connected to the student name and ID, in Alteryx only the columns from the student table have been fed through in the left join. You still get the information that you need though so in my head, this actually makes more sense than having completely null columns, but perhaps I haven't thought it through well enough.
Full Outer Join
As with the regular left join, to obtain all of the parts of the puzzle that you'd like in the Venn diagram, you need to combine all of the outputs from the join with a union.

A fun additional thing to note in Alteryx is that you can choose how you'd like to order your output, as you'll see from the bottom, left-hand corner. I'm not sure where that would be of much importance (I'm definitely no expert on the subject!) but it is a nice addition to have either way.
Cross Join
To cross join in Alteryx, you actually don't use a join tool at all. Although the tool that you do use is found in the purple join tab so maybe it counts? I would say no because union is also found within the tab and that is not a join. Maybe they should rename the tab as 'combine'? I feel like that better covers what the tools can function as within that tab. Anyone fancy signing a petition? I'm kidding - and I digress from the point. Sorry about the side tangent! What you're looking for is the append tool. All you need to do is connect your two tables to the input connectors and boom, a cross join is born.
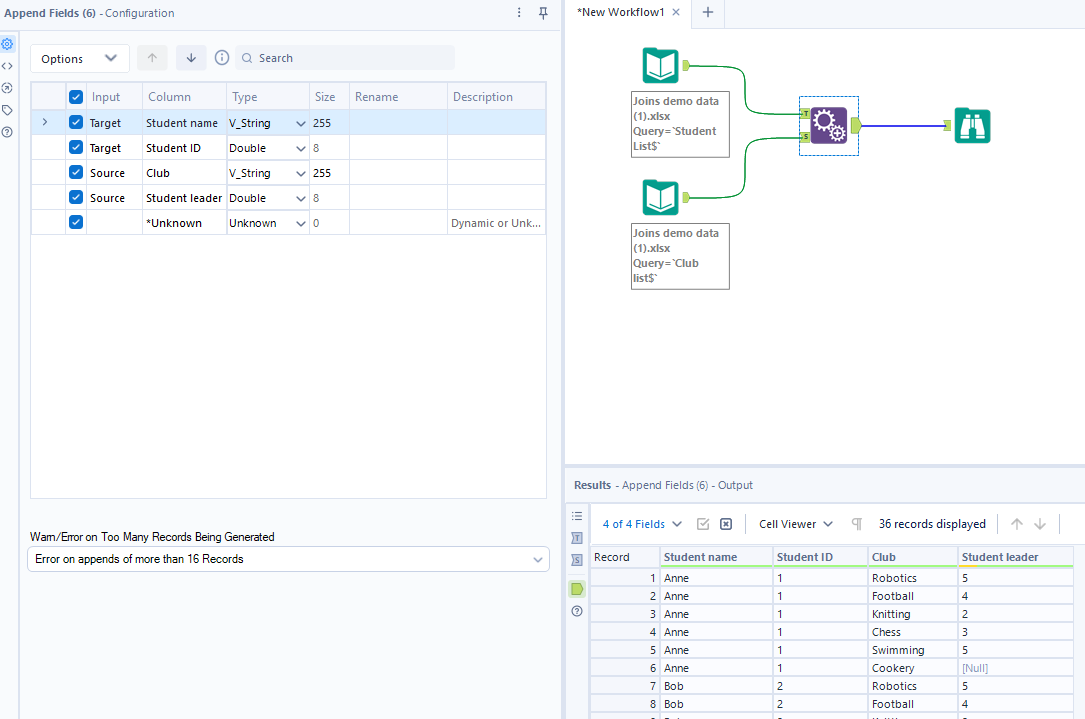
Something you might note here is that there is an option to error if the append contains more than 16 records. These 16 records are in the original table because it could create a massive explosion of rows depending on your dataset. We're lucky, we only have 36 records total after the cross join but something to be considered otherwise.
In case you were wondering, you can also cross join using the same method as we used in Tableau Prep, creating a dummy column in each table using the formula tool and joining them on that.
Power Query
I think before starting on joins in Power Query, I'd like to offer a congratulations for making it this far (this doesn't count if you've just scrolled to the Power Query section - go back and read the other important stuff, especially the part about understanding joins!). I didn't realise how long this blog was going to be when I began writing it. Surprisingly, I'm not actually regretting the decision to write this (despite being almost 2700 words in with a fair few more to go - I should probably be honest with myself and admit that only half of those at best might actually contain useful content so might not be as much of an achievement as it sounds like to me, and might also be indicative that I need to stop rambling) but I am becoming a little crazed by thinking about joins for so long. Hopefully, the rest of this still makes sense. Don't worry, I proofread so if you feel like you've been reading this forever, just remember that I not only had to plan it and write it but also read it again. You still get my congratulations for investing in your own development by learning about the important data preparation step that is joins. Anyway, side tangent over.
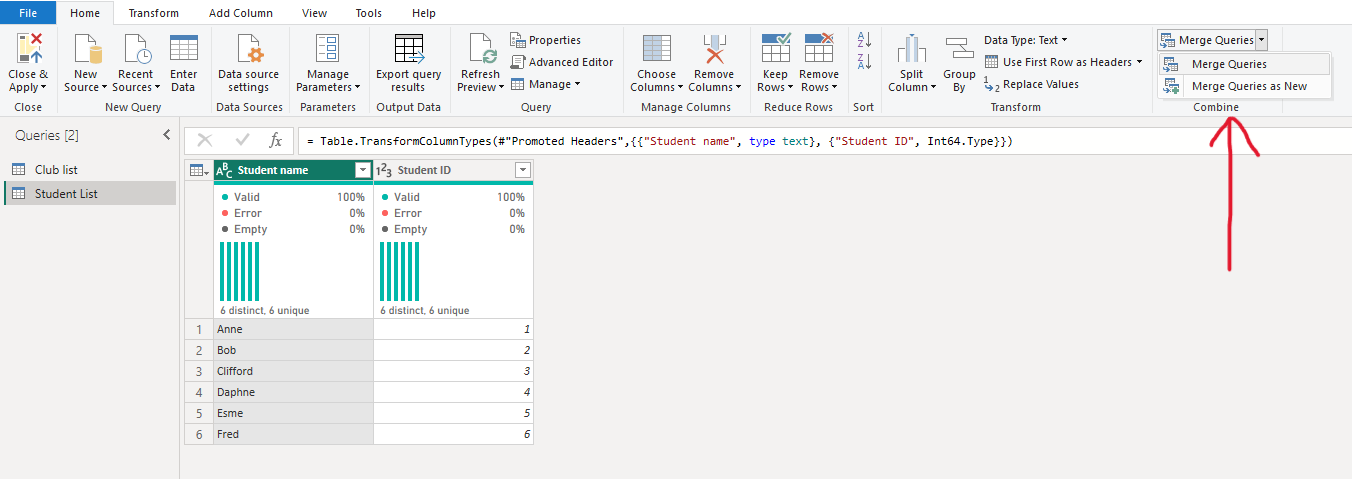
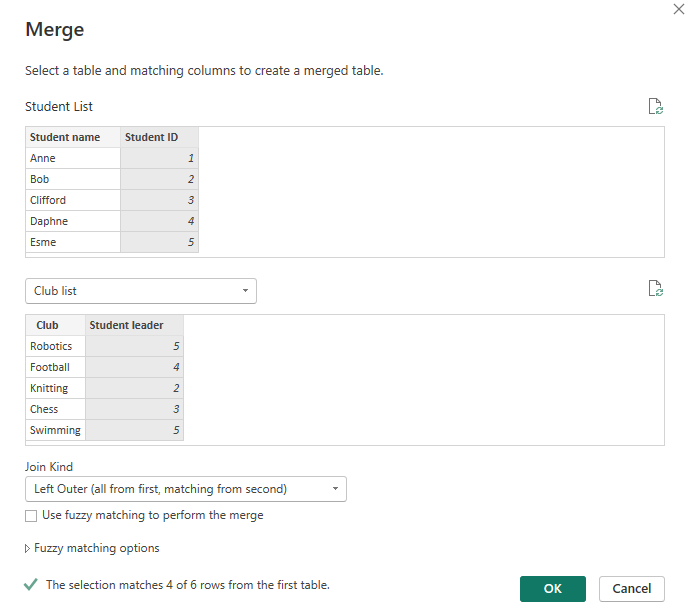
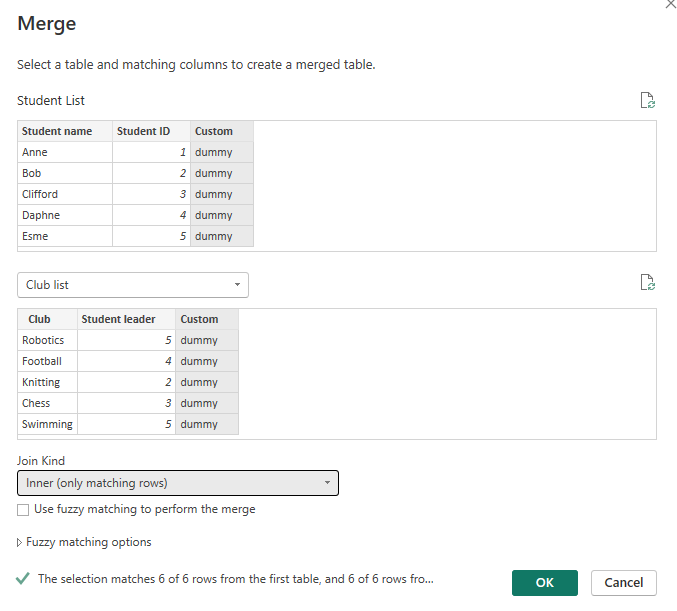
To perform a join in Power Query, first load your data. You should have both your tables available. Then, within one of your tables (I've chosen the student table as I wanted that to be my 'left' table), go to the home tab and select merge queries on the far right hand side. You can choose simply to merge the queries which makes the join changes to this table but the other table will remain as it was, or you can merge queries as new which creates a brand new, separate join output. You must click the little arrow on the right side of merge queries to get these options, otherwise it will default to merge in the current table.
Inner Join
Whilst the process itself is a little different to Tableau Prep and Alteryx, the fundamentals stay the same. Once you've chosen how to merge your queries, a pop-up window will appear making your life quite easy. You need to add your club list as your other table, and specify your join kind as inner. Then select the columns that you're joining on. Power Query will let you know in a brief description at the bottom how many rows are being matched from each table but it gets cut off for some reason before reaching the end. Maybe we'll never know if it specifies how many rows are output.
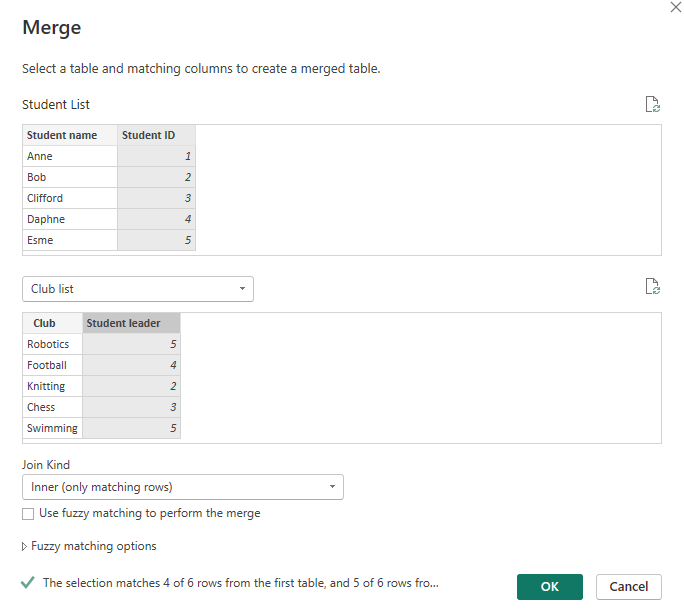
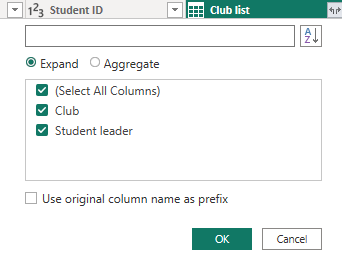
Another helpful thing that Power Query does is that it explains what is being output in that particular join. I suppose this is in place of the Venn diagram and I expect that this will work better for some people whilst others might prefer the visual element. Once joined, click the top right double arrow icon to expand the table.
After actually reading the pop-up window that appears this time around (I'm definitely someone that agrees to terms and conditions without reading them...), I chose to deselect the option to use the original column name (the previous table name of club list) as a prefix.
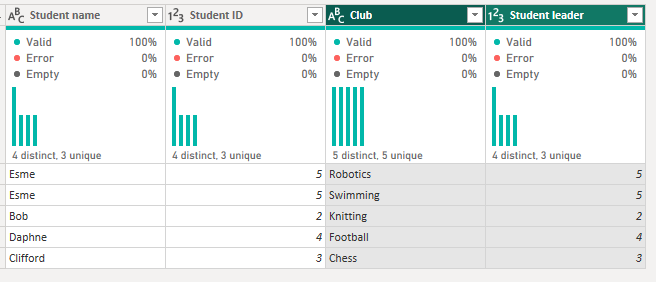
And there you have your first join in Power Query.
Left Join
I feel like the left join is at its simplest in Power Query because all you have to do is change your join type in the pop-up window from inner to left join. Of note, this is referred to as a left outer join in Power Query though.
Interestingly, in the merged table, the rows are grouped by whether they have a matching row in the club table or not. Just something to note.
Left Join excluding Inner Join
This uses exactly the same steps as above, except this time the join kind is called 'Left Anti'. I quite enjoy this as it makes it feel like the villain in the story, the antagonist. What did those two rows ever do to me? Nothing. I just like the drama of the naming system.
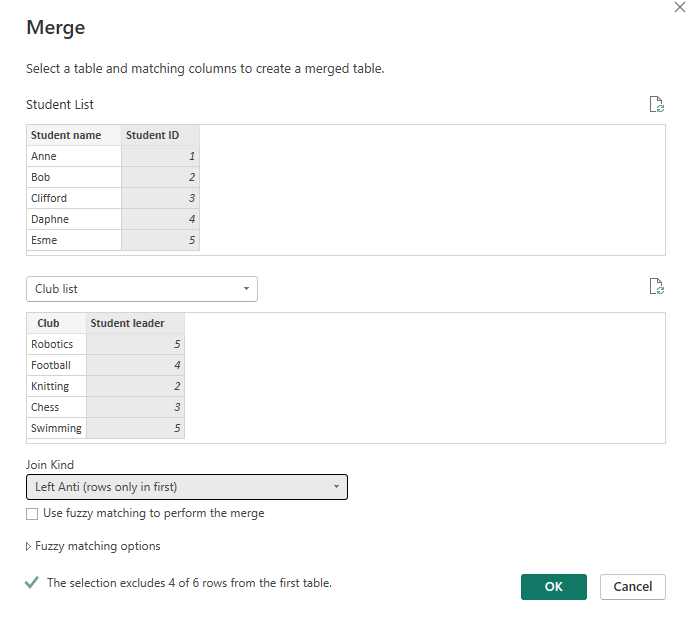
Be careful when reading the text at the bottom of the pop-up window. Instead of saying how many rows will be included, it decides the best option is to say how many rows will be excluded and let you do the maths.
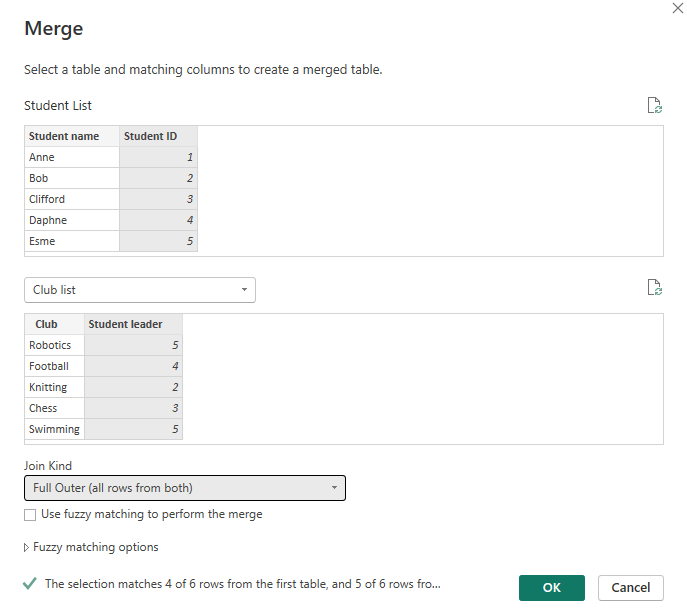
Full Outer Join
As you probably anticipated at this point, to perform a full outer join all you need to do differently from the previous steps is change the join kind to Full Outer.
Cross Join
This is where all the excitement happens. As you've probably realised by now, cross joins are a unique kind of join and for that, we need to do unique things. Without a cross join option in the pop-up window, we're going to need to branch out. How wild.
To use this new method we need to go to Add column > Custom column. In that pop-up window, we then need to add our club list table. It should pop up with a little blue cube next to it as you type it in.
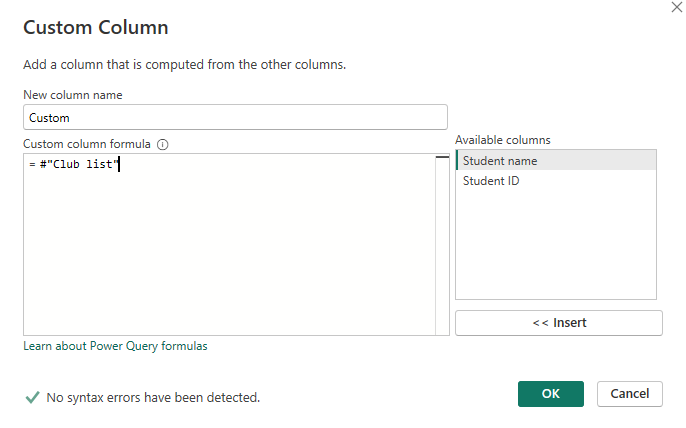
Then all you do is expand the newly created table again and ta da, you've achieved your cross join badge.
Again, in case you were wondering, you can also use the same forced relationship methodology as we mentioned in Tableau Prep and Power Query. First, create a custom column in each of the tables with dummy as your string. Just make sure that you're using double quotes as M code is very strict about formatting.
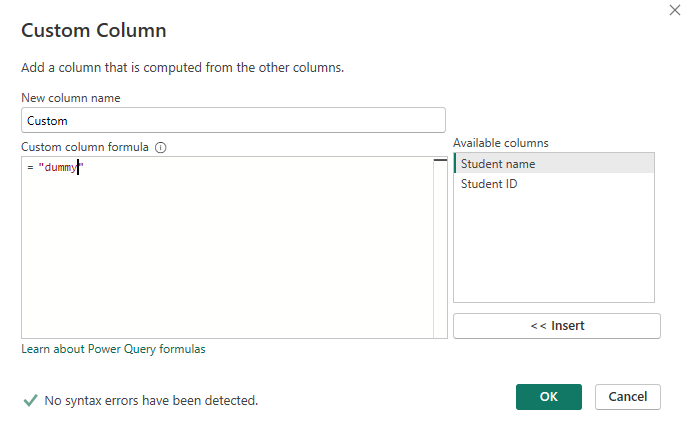
Then perform an inner join using the dummy columns as your matching fields.

Then delete your two dummy columns and boom. You've now unlocked your second cross join badge. Careful, you won't have space for all these badges soon.
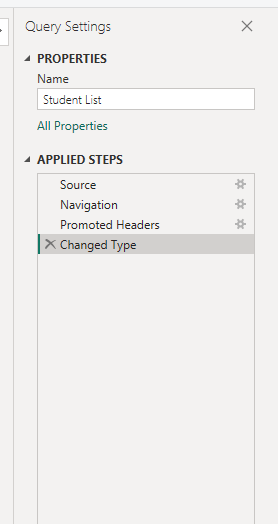
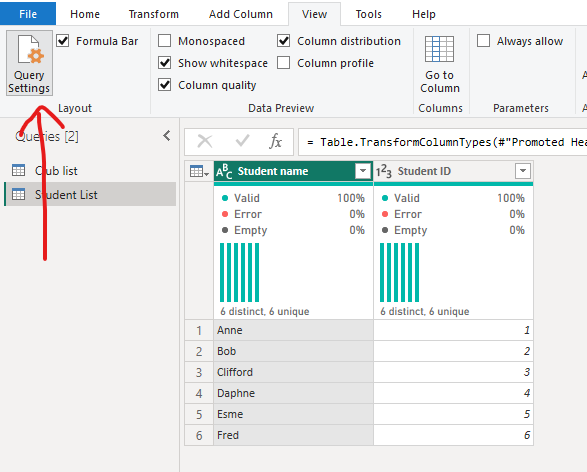
A Power Query bonus tip: This is unrelated to joins but something I discovered after making the grave mistake of exiting from the applied steps pane. If you too also do this accidentally and wonder how you're ever going to recover, don't fear. I've got your back. Just go to the view tab and click query settings on the left hand side. It will pop right back up.


And we made it. Look at us go. At this point, I think you've reached expert status on joins for data preparation in Tableau Prep, Alteryx and Power Query. I don't where I evolved into this video game style terminology but you know, it's been a long blog. I had to make things a little more exciting... not that joins aren't exciting enough as they are.
I hope you've learned lots in this blog and feel more confident in how to join across multiple platforms now. I hope that you also feel comfortable with the differences between the platforms too and that it doesn't feel overwhelming if you have to switch between the platforms as each of them have similarities in their fundamental steps to perform joins. You're also, of course, more than welcome to come back to the blog if you forget any of these details so at least you've added a new weapon to your armour even if you haven't yet memorised the techniques.
That's everything from me today. As I mentioned before, I'll be writing more of these 'Back to Basics' blogs so if you found this useful, I'd recommend checking them out. And if you didn't find this useful, firstly I'm sorry that you read the whole of this blog for it not to help you, and secondly, one of my other blogs might speak to you more so head on over with everyone else. All that's left to say now is until next time, happy prepping!