


Welcome back to another 'Back to Basics' style blog where I explore how to complete a fairly simple step across the three data preparation platforms that we learn in training at the Data School: Tableau Prep, Power Query and Alteryx (as you could probably tell from the title!). If you've read my other recent blogs, you'll know that I worked my way through a whole year of Preppin' Data challenges, and because I did this exclusively in Tableau Prep I thought about how the steps might translate across different software. Ranking, for example, is very simple to perform in Tableau Prep as you'll find out. It's a little trickier in Power Query but there are other steps, such as filling down which I discussed in my previous blog, where the difficulty is reversed. As it's important to be versatile, I think it's good to know how to perform these steps across all the platforms regardless of how difficult that translation might be and that's what we'll be going through today for ranking specifically.
I created a very small dataset exploring the sales performance of three employees to make things easier as you'll see below, and used this for all three platforms. I wanted to explore ranking across the whole dataset as well as ranking by month (e.g. comparing how Bob performed in February vs Larry) and ranking by person (e.g. comparing how Lionel performed in January vs March). So let's see how to do this, starting in Tableau Prep!
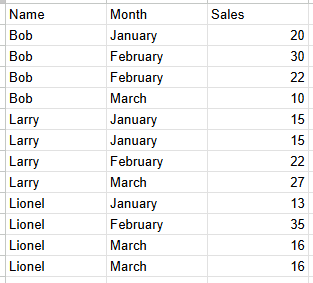
Tableau Prep
I would say ranking is simplest in Tableau Prep so that's where we'll begin, but maybe I'm biased. There are some quick calculated fields that are already written into Tableau Prep which make the steps easier to complete and ranking is thankfully one of these calculated fields. All you have to do is go to the field that you're ranking on, in this case sales, and select the three dots in the corner > Create calculated field > Rank.

When you do this, a pop-up window will appear where you can add the fields that you'd like to rank by (using the plus in the corner to add fields) or you can leave it empty and it will group by the full table. You can add more than one field to your group by field if you wish to do so, but my dataset was a little small for that so I didn't. You can also specify whether you'd like your field to be ranked ascending or descending by clicking the Z to A option.

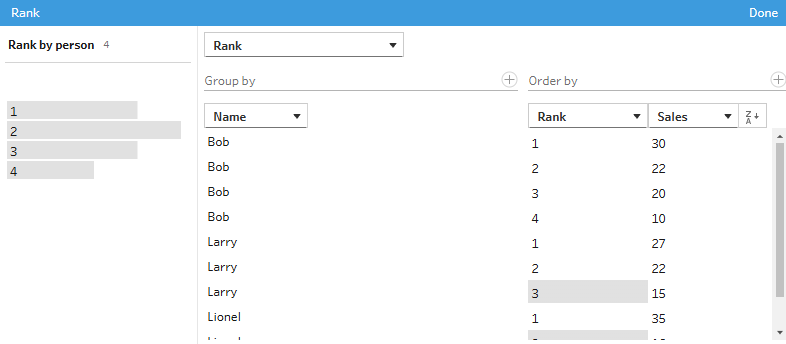
Tableau Prep by default uses the rank competition format. This means that if two values tie, then they receive the same rank but the rank after is skipped (e.g. 1, 2, 2, 4). You can use the other rank formats in Tableau Prep but you have to write your own calculation for these which is a little bit more of a faff, although easy to get done when you understand what you're doing. If you go to your changes pane, you can see how the pop-up window rank is formatted which makes for a good initial follow along or just see how I've written it below. I used the default rank option as my guide and then adjusted the end rank function.
The rank options you can choose from are:
- RANK (this is the default, competition style one)
- RANK_DENSE (1, 2, 2, 3)
- RANK_MODIFIED (1, 3, 3, 4)
- RANK_PERCENTILE (0, 0.33, 0.66, 1)
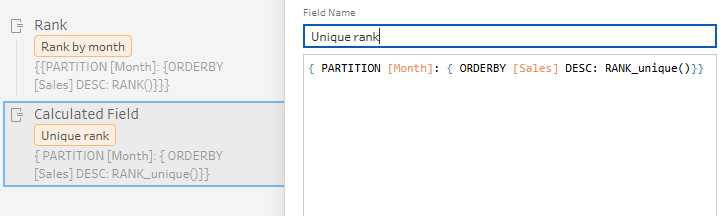
As I know there is also a RANK_UNIQUE (1, 2, 3, 4) option, I tried this out and whilst it doesn't come up in the pop-up menu when you start typing it in, it does work as a function so you can also try that if you'd like.
To briefly explain what the overall calculation means, you essentially need to type what you want to group by into the PARTITION section (not mandatory), how you want the rank to follow using the ORDERBY with DESC/ASC, and the type of rank at the end. That's all for ranking in Tableau Prep. Pretty self-explanatory as I'm sure you'd agree, especially when just using the default pop-up window option.
Alteryx
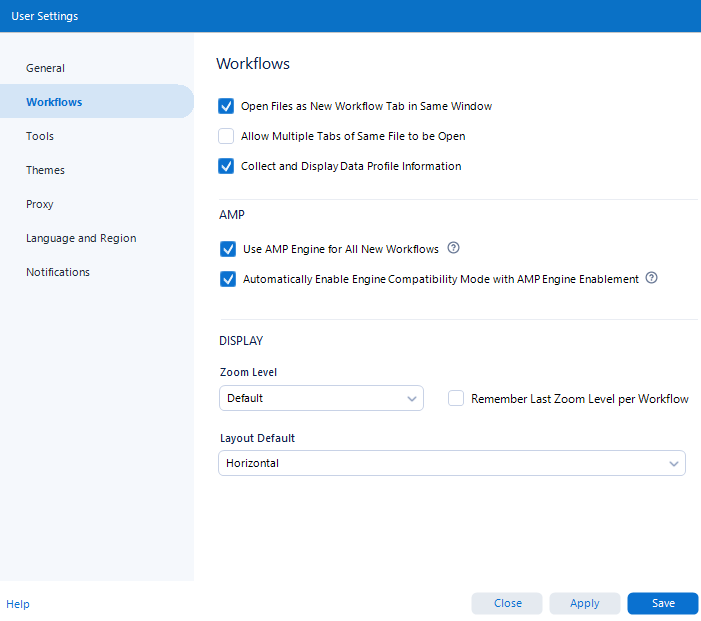
Ranking in Alteryx is also fairly simple as it just uses one of the pre-set tools. Something you do need to note here though is that your AMP engine has to be enabled for the tool to work. Apparently the tool is specifically designed to work in the AMP environment which is why it only works with it turned on. If you have the AMP engine turned off by default, never fear. Just go to Options in your toolbar > User settings > Edit User Settings and ensure your window is set up as below.
Now to the fun stuff. To rank in Alteryx, you just need to drag a rank tool from your preparation tab into the workflow and a pop-up window will appear in your left hand configuration pane. Then all you need to do is fill it out.

You can choose which type of ranking you'd like to use. To equivocate to Tableau Prep:
- Ordinal Ranking = Rank_unique
- Dense Ranking = Rank_dense
- Standard Ranking = Rank
- Modified Competition Ranking = Rank_modified
- Fractional Ranking = Rank_percentile
You can also add the field(s) that you're ranking on and how, plus the columns you'd like to group by if any at all.
And that's pretty much ranking in Alteryx.
Power Query
Ranking in Power Query was easily the most difficult to determine out of the three platforms but equally, I definitely learnt the most here too. Swings and roundabouts! Let's start by first looking at overall ranking before going through how to rank within groups.
Unlike in Tableau Prep and Alteryx, Power Query sadly does not have a simple built-in function to easily add a rank. If you're very unfussed about how your ranking is completed and you're just happy for it to use the rank_unique function where each row gets its own individual ranking, you can simply sort the field being ranked before adding an index column.
If you'd like a little more structure/choice to your ranking, then you'll need to add a custom column. Start by going to the transform tab and selecting custom column. You then need to add the formula below. For some reason, when I try to show it in my window it only comes out as white which is why I'm doing it in retrospect using the formula window instead!

To explain what's going on, you first need to start by telling Power Query that you want to add a rank column to your table. But what table? You hear Power Query ask. So you need to specify the table name. The table is referred to by using whatever the previous step in your changes pane was. For me, this was renamed columns and therefore I've added renamed columns into the formula. The next part of the formula is specifying what you want your column name to be (e.g. Modified Rank). You then need to tell it what you're ordering by, and how. Finally, you need to specify what kind of ranking you want to use. Unlike in Tableau Prep, you can't simply insert any rank function but you have some choice as you can see below. I'm not too sure what rankkind.type is but from a brief google, it doesn't look like you can actually rank with it. 3 ranking options are still enough for me!

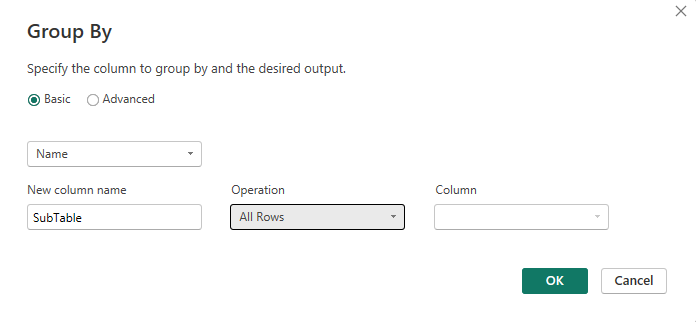
So, as you can see, it's a little less straightforward to simply rank in Power Query. But now we want to rank within a specific group. How do we do that? We need to first create a sub-table where your rows are grouped. This is not aggregating them and we'll still get individual ranks by row but it does allow for the ranking to restart for your new group. To do this, go to transform > Group By and you'll get the pop-up window below to come up. In the window, you need to specify the field you're grouping by (e.g. Name) and what you want to call this newly created table. They call it a column but it's going to be a new table. Your operation should be set to all rows so they all come through and column should be left blank. Note, if you want to group by multiple fields (e.g. name and month), you can do this by changing the group by to advanced rather than basic.
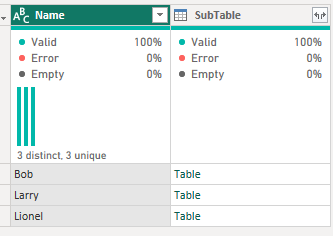
Don't touch the initial output you receive above. You might think you need to expand it using the little arrows, don't do that just yet. You now need to do the add rank column formula like we did with the original table by going to Transform > Custom column.

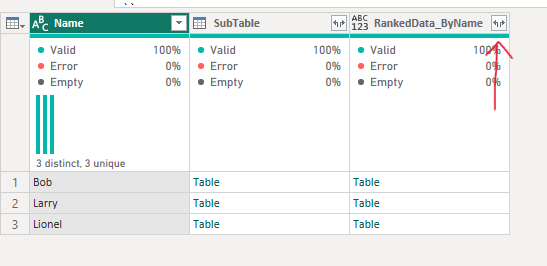
So, as you can see above, it's pretty similar to how we completed the original add rows except you need to add the little section about the new table that we've created. Begin just by using add column, then you refer to the previous step (e.g. Grouped Rows) and add your prefix for all your new columns (RankedData_ByName). You then have to explain you're going to be ranking your new sub-table and go through how you're doing that using the same formula as we used originally. There are 2 curly brackets at the end of the formula but you can't see them in my screenshot - make sure you include them or it won't work!
Your output will look similar to mine below. Make sure that you expand by clicking the arrows at the top of your new table.
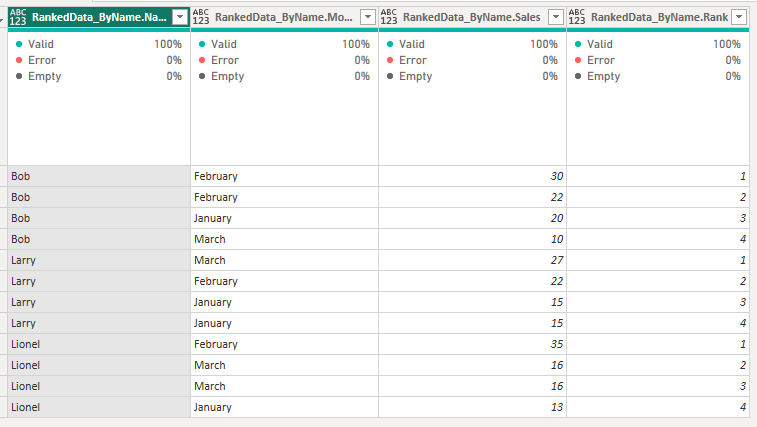
You can delete those initial two columns and before you know it, you'll have your wonderfully ranked output.
And so, that's how to rank in Tableau Prep, Alteryx and Power Query. Some platforms are definitely easier than others but you now know how to master ranking in each of them. I might be comparing some other data preparation steps in more 'Back to Basics' style blogs so stick around and take a look at the other stuff I've written so you can expand your repertoire of knowledge. Until next time, happy ranking!