


We’ve all been there: you’re in the middle of a training session, a task drops, and suddenly your screen is staring back at you with a pile of CSV data and a blank Snowflake console. I vividly remember that exact moment of panic when I realized I had no idea how to bridge the gap between the two. I learned how to handle it the hard way through trial and error, but you don’t have to.
Whether you're working on a training assignment or spinning up a personal project, this step-by-step guide is designed to save you the headache and walk you through exactly how to pull CSV data into Snowflake, smoothly and stress-free.
The Netflix data I've used for this tutorial can be found here
Step 1: Create a Database
CREATE database IF NOT EXISTS my_demo_db;
- CREATE DATABASE: Tells Snowflake to set up a new data warehouse container.
- IF NOT EXISTS: Checks if the database already exists, if true then Snowflake will just move on without erroring.
- my_demo_db: Specify the name of your database.
Step 2: Create a Schema inside the Database you created above
USE database my_demo_db;
CREATE schema IF NOT EXISTS netflix_schema;
- USE DATABASE my_demo_db: Tells Snowflake to look inside your new database.
- CREATE SCHEMA: Creates a smaller organizational folder inside that database.
Step 3: Create a Table inside the Schema above
USE schema netflix_schema;
CREATE OR REPLACE TABLE netflix_staging (
show_id VARCHAR(1024),
type VARCHAR(1024),
title VARCHAR(1024),
director VARCHAR(1024),
cast VARCHAR(1024),
country VARCHAR(1024),
date_added VARCHAR(1024),
release_year INT,
rating VARCHAR(1024),
duration VARCHAR(1024),
listed_in VARCHAR(1024),
description VARCHAR(1024)
)
- USE SCHEMA netflix_schema: Tells Snowflake where to build the table.
- CREATE OR REPLACE TABLE netflix_staging: Builds the table structure. If a table with this name already exists, OR REPLACE will wipe it out and start fresh. Inside it you can specify the data types of the incoming columns.
Step 4: Specify the File Format for the incoming CSV file
CREATE OR REPLACE FILE FORMAT csv_format
TYPE = 'CSV'
SKIP_HEADER = 1
FIELD_OPTIONALLY_ENCLOSED_BY = '"';
- CREATE OR REPLACE FILE FORMAT csv_format: Creates a reusable blueprint named csv_format that teaches Snowflake how to read your specific file type.
- TYPE = 'CSV': Confirms that the incoming data is comma-separated text.
- SKIP_HEADER = 1: Tells Snowflake to ignore the very first row of the CSV file, which in this case contains headers rather than actual data.
Step 5: Create a Stage
CREATE OR REPLACE STAGE local_stage;
Oops, I think here I actually want to give my Stage a more descriptive name. To rename my stage I've used the below:
ALTER STAGE IF EXISTS local_stage RENAME TO stage_netflix_data;
Step 6: Manually Upload the CSV into the Stage you just created
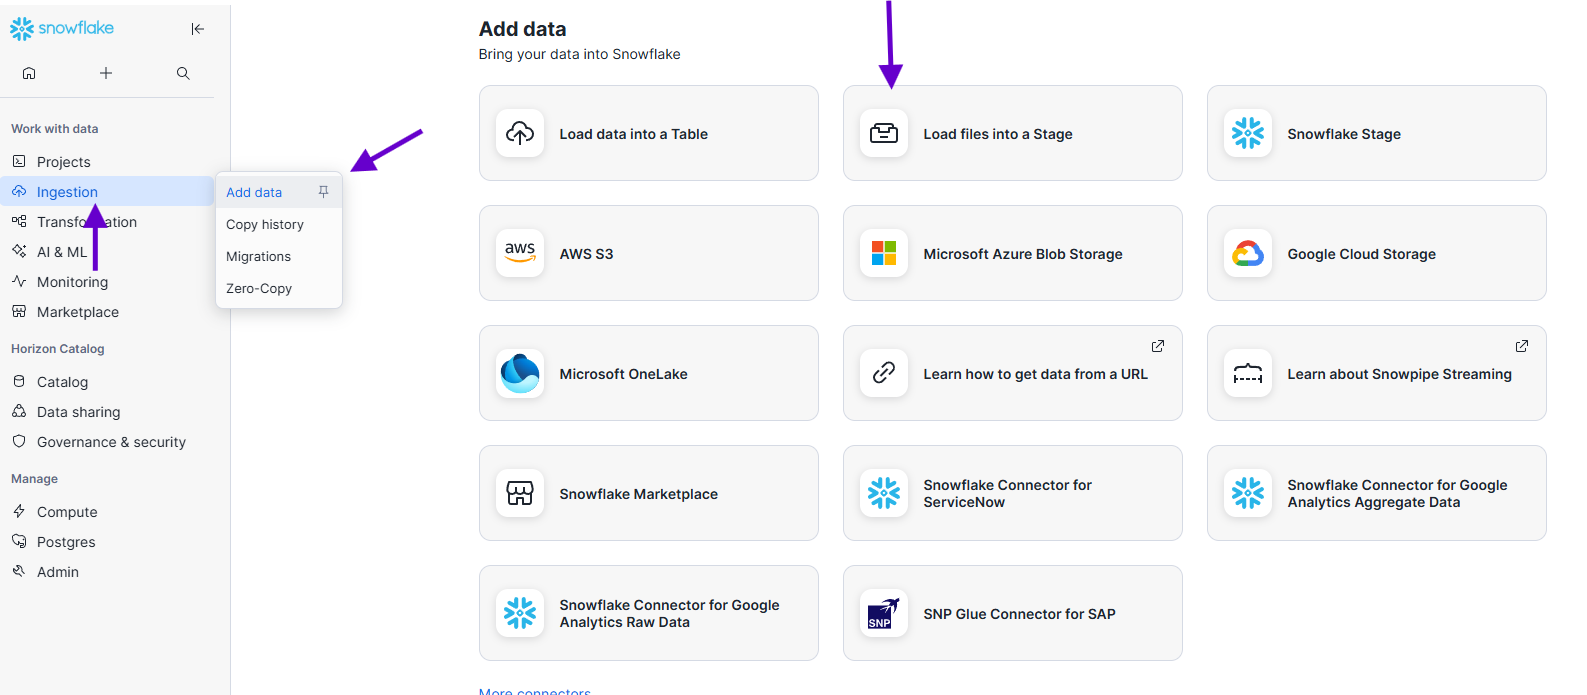
Look at the left-hand navigation sidebar. Navigate to Ingestion > Add Data > Load Files into a Stage.
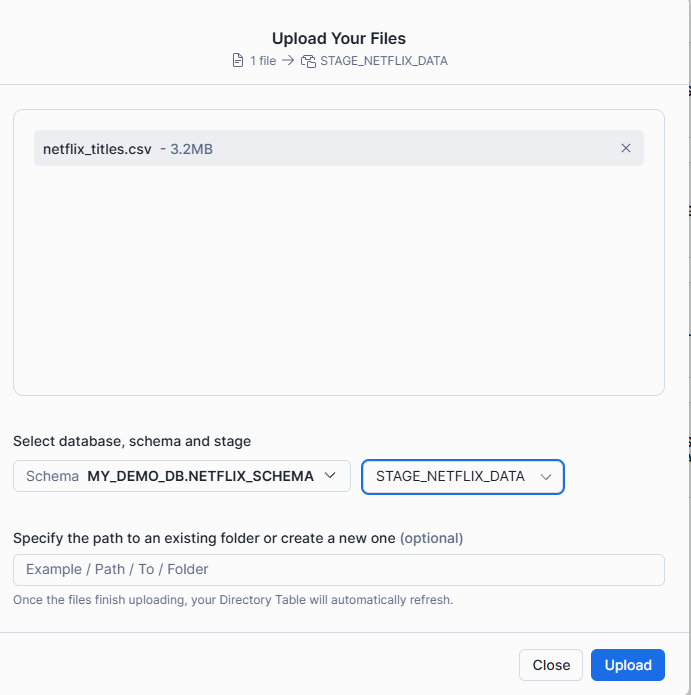
Next, in the configuration window upload your CSV file and select the Database, Schema and Stage you've just created. Essentially, this tells Snowflake where to load your file to.
Once you upload your CSV make sure to go back to your workspace and run the following:
LIST @stage_netflix_data;
This should return a result of 1 record like below, which confirms that all the steps we've taken so far are correct and the file was loaded inside the Stage.

Step 7: Load the data from the CSV file into the table created in Step 3
COPY INTO netflix_staging
FROM @stage_netflix_data
FILE_FORMAT = (FORMAT_NAME = 'csv_format')
ON_ERROR = 'CONTINUE';
Once you run the above code, you should see the below table with "LOADED" in status and 0 errors_seen confirms that the data was loaded successfully.

- COPY INTO: Specifies the destination table where all the data will live.
- FROM: Tells Snowflake exactly where to grab the files. The @ symbol is critical, it tells Snowflake that you are referencing a Stage object rather than a standard table.
- FILE_FORMAT = (FORMAT_NAME = 'csv_format'): Points Snowflake back to the blueprint created in Step 4 so it knows how to parse the incoming text rows correctly.
- ON_ERROR = 'CONTINUE': If Snowflake hits a bad row (like a corrupted text string or a formatting mismatch), this flag tells it to skip that specific row and keep loading the rest of the file rather than failing the entire operation.
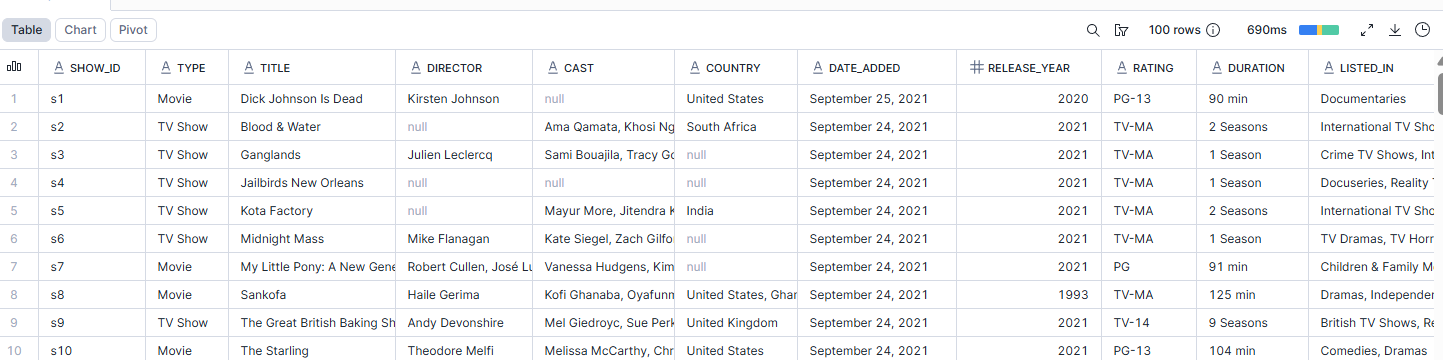
Step 8: Check that the data was loaded correctly by running a SELECT query
SELECT *
FROM netflix_staging
LIMIT 100;
Make sure you specify a limit, as this is just a quick check that the data was loaded the way you expected. Note: there are some Null values, I've double checked that the values are missing from the CSV file.
Full SQL Script
CREATE database IF NOT EXISTS my_demo_db;
USE database my_demo_db;
CREATE schema IF NOT EXISTS netflix_schema;
USE schema netflix_schema;
CREATE OR REPLACE TABLE netflix_staging (
show_id VARCHAR(1024),
type VARCHAR(1024),
title VARCHAR(1024),
director VARCHAR(1024),
cast VARCHAR(1024),
country VARCHAR(1024),
date_added VARCHAR(1024),
release_year INT,
rating VARCHAR(1024),
duration VARCHAR(1024),
listed_in VARCHAR(1024),
description VARCHAR(1024)
)
CREATE OR REPLACE FILE FORMAT csv_format
TYPE = 'CSV'
SKIP_HEADER = 1
FIELD_OPTIONALLY_ENCLOSED_BY = '"';
CREATE OR REPLACE STAGE local_stage;
ALTER STAGE IF EXISTS local_stage RENAME TO stage_netflix_data;
LIST @stage_netflix_data;
COPY INTO netflix_staging
FROM @stage_netflix_data
FILE_FORMAT = (FORMAT_NAME = 'csv_format')
ON_ERROR = 'CONTINUE';
SELECT *
FROM netflix_staging
LIMIT 100;
Bonus: If your goal is to manually populate a table follow the above steps up to Step 2 adding the steps below
...
USE schema dummy_schema;
CREATE OR REPLACE TABLE supporter (
id INT,
first_name VARCHAR(50),
last_name VARCHAR(50),
referrer_id INT
);
INSERT INTO supporter (id, first_name, last_name, referrer_id) VALUES
(1, 'Marlene', 'Wagner', NULL), (2, 'Lonnie', 'Goodwin', 1), (3, 'Sophie', 'Peters', 1),
(4, 'Edwin', 'Paul', 2), (5, 'Hugh', 'Thornton', 2), (6, 'Gilbert', 'Monroe', 3),
(7, 'Beatrice', 'Owens', 3), (8, 'Clara', 'Rhodes', 4), (9, 'Alvin', 'Knight', 4),
(10, 'Glenda', 'Boyd', 5), (11, 'Daryl', 'Garrett', 5), (12, 'Cheryl', 'Banks', 6),
(13, 'Owen', 'Gomez', 6), (14, 'Julio', 'Berry', 7), (15, 'Floyd', 'Page', 1),
(16, 'Mildred', 'Carr', 15), (17, 'Arthur', 'Fuller', 15), (18, 'Paula', 'Sims', 16),
(19, 'Louis', 'Duncan', 16), (20, 'Albert', 'Gross', 17), (21, 'Willie', 'Hale', 2),
(22, 'Raymond', 'Beck', 3), (23, 'Lois', 'Jennings', 4), (24, 'Emily', 'Hopkins', 5),
(25, 'Eugene', 'Reid', 6), (26, 'Juanita', 'Ward', 7), (27, 'Martin', 'Lucas', 8),
(28, 'Peggy', 'Harvey', 9), (29, 'Chris', 'Barrett', 10), (30, 'Gladys', 'Martinez', 11),
(31, 'Peter', 'Oliver', 12), (32, 'Doris', 'Glover', 13), (33, 'Matthew', 'Hardy', 14),
(34, 'Gail', 'Vance', 18), (35, 'Gertrude', 'Sanders', 19), (36, 'Martha', 'Guzman', 20),
(37, 'Fred', 'Flores', 21), (38, 'Harry', 'Burgess', 22), (39, 'Melvin', 'Webb', 23),
(40, 'Lillian', 'George', 24), (41, 'Alice', 'Wilkins', 25), (42, 'Philip', 'Taylor', 26),
(43, 'Kathryn', 'Armstrong', 27), (44, 'Frances', 'Thomas', 28), (45, 'Jane', 'Moore', 29),
(46, 'Wayne', 'Lee', 30), (47, 'Carl', 'Martin', 31), (48, 'Judy', 'Jackson', 32),
(49, 'Ruby', 'White', 33), (50, 'Donald', 'Harris', 34);
Note: You still need to CREATE a table for the data that you want to manually input. The only difference is you don't need to navigate to the Upload Data part as you can use INSERT INTO supporter (id, first_name, last_name, referrer_id) VALUES to specify the values that you want to include. For this to work, you need to reference the fields stated in the CREATE table statement and follow that pattern for each row of the table you are inserting in the INSERT VALUES statement.