


In this 3-part blog series, we’ll walk through the process of extracting data from the Amplitude API using Python, uploading the output files to an Amazon S3 bucket, and finally loading that data into a Snowflake table.
Part three: Loading Data from S3 into Snowflake
Loading data from S3 into Snowflake allows you to efficiently centralise and analyse large datasets stored in AWS. This process involves setting up a secure connection between Snowflake and your S3 bucket using a storage integration—a method that avoids storing AWS credentials directly in Snowflake.
Step 1: Create IAM Policy and Role in AWS
Before configuring the integration in Snowflake, create an IAM policy and role in your AWS account:
- Create an IAM policy that grants access to the S3 bucket you plan to use.
- Create an IAM role and:
- Choose “Use this account” when prompted.
- Enter Snowflake's AWS account ID (e.g.,
000000000000as a placeholder). - Attach the IAM policy you created.
- Complete the role setup.
Step 2: Create the Storage Integration in Snowflake
In Snowflake, execute the following SQL to create the storage integration:
CREATE OR REPLACE STORAGE INTEGRATION my_s3_integration
TYPE = EXTERNAL_STAGE
STORAGE_PROVIDER = S3
ENABLED = TRUE
STORAGE_AWS_ROLE_ARN = 'arn:aws:iam <AWS_ACCOUNT_ID>:role/<IAM_ROLE_NAME>'
STORAGE_ALLOWED_LOCATIONS = ('s3://your-bucket-name/path/');
Step 3: Retrieve Integration Details
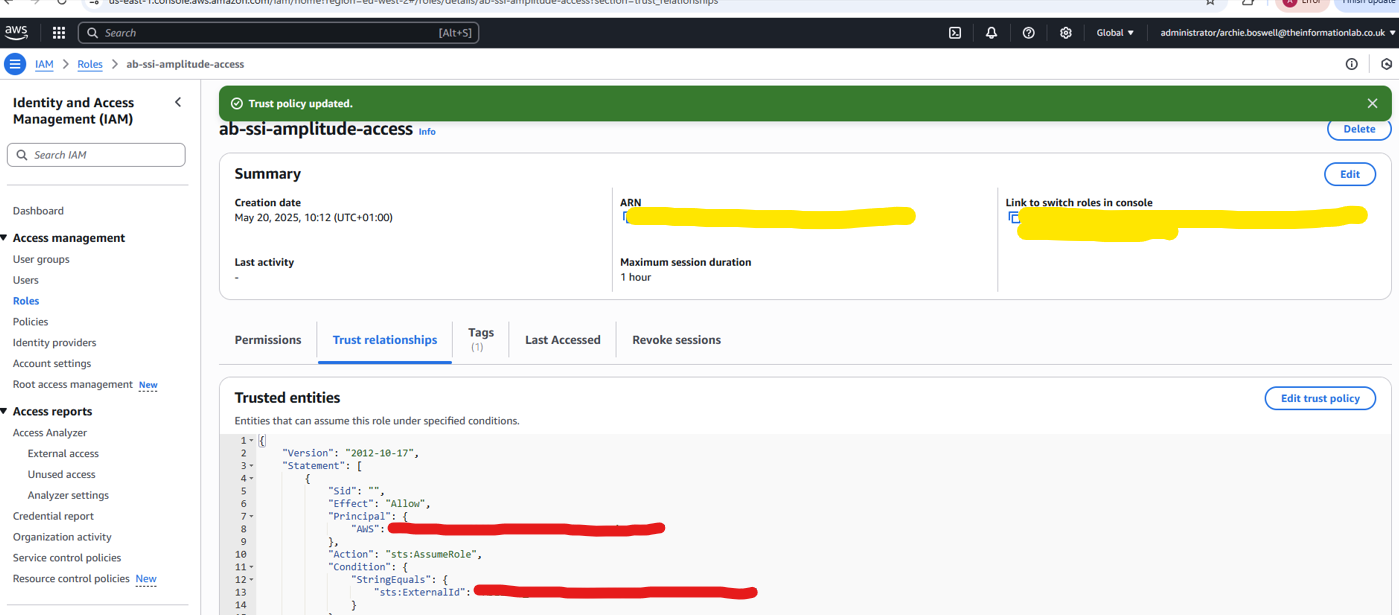
Run the following command in Snowflake to retrieve the external ID and other required information for updating your IAM role’s trust policy:
DESC INTEGRATION my_s3_integration;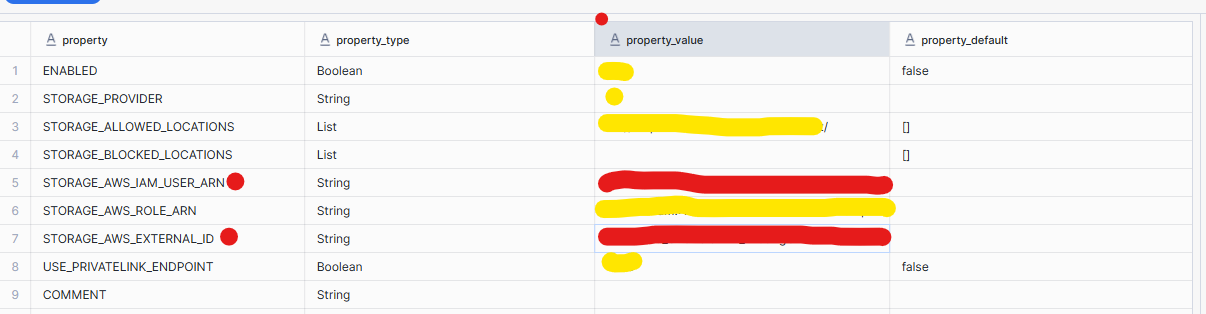
Copy and paste the values covered in red and copy them into the trust policy in AWS (where the code is highlighted red)
Step 4: Create a File Format
Define a file format in Snowflake to specify how the data should be interpreted when read from S3 (e.g., CSV, JSON, Parquet). Example for CSV:
CREATE OR REPLACE FILE FORMAT my_csv_format
  TYPE = 'CSV'
  FIELD_OPTIONALLY_ENCLOSED_BY = '"'
  SKIP_HEADER = 1
  NULL_IF = ('NULL', 'null');
Adjust parameters to match your file structure and type.
Step 5: Create an External Stage
Create a stage in Snowflake to reference the files in your S3 bucket using the storage integration:
CREATE OR REPLACE STAGE my_s3_stage
URL = 's3://your-bucket-name/path/'
STORAGE_INTEGRATION = your_storage_integration_name;
Step 6: Validate the Stage and Prepare the Target Table
List files in the stage to confirm Snowflake can access the S3 bucket:
LIST @my_s3_stage;Create a target table that matches the structure of your incoming data:
CREATE OR REPLACE TABLE my_bronze_table (
  column1 STRING,
  column2 STRING,
  ...
);
Step 7: Load Data into the Table (Bronze Layer)
COPY INTO my_bronze_table
FROM @my_s3_stage
FILE_FORMAT = (FORMAT_NAME = my_csv_format);
This marks the bronze layer of your data pipeline—a raw but centralised and queryable form of the source data.