


During one of our client projects, we were given a challenge, which consisted of merging 2 different shapefiles, in order to visualise them in Tableau. These files corresponded to the same area, one containing the other (e.g Counties within Regions). In this blog post, I will describe this process, using Italian Regions and Provinces (sub-areas of Regions).
I carried out this process using Alteryx. All you need to perform this process are the 2 polygon shapefiles you want to merge.
Starting from the file with the smallest geographical areas (e.g provinces), use a summarize tool.
In the configuration pane, select a field which contains the areas name, and Group by this field. Then select the polygon spatial field, and press Add-Spatial-Create centroid.
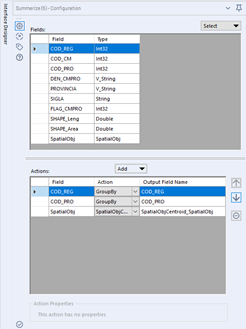
This step will create a new spatial field, containing the central point of the original polygon.
The next step consists of re-joining the input file with the output of the summarize tool. To do so simply join using the areas names field, which was previously used to Group by the central points. This step will allow adding the areas central points without losing the remaining fields.

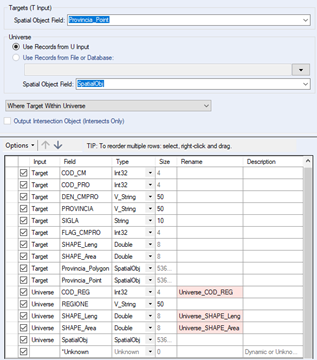
The next step consists of matching the point previously generated to the shapefiles containing the largest areas (e.g regions). To do so, import the second shapefile, and connect this to the U (Universe) input of the tool Spatial Match. Connect the J output of the join to the T (Target) input.
In the Spatial Tool configuration pane, select the point spatial field (usually called centroid) in the Target dropdown menu (the universe should only have 1 spatial field, so just leave it). In the third dropdown menu select ‘Where Target Within Universe’. You can also use this tool to rename your spatial fields. It is important to distinguish the 2 polygon fields since those are the ones necessary to visualise the areas in Tableau.
In the last tool, I simply renamed some fields and removed the spatial field which contains the points. Your final output should contain 2 polygon spatial fields. After this, you can generate the output. The file needs to be saved as ESRI Shapefile (*shp). This will generate 4 different files, all with the same names, with the following extensions: .shp, .SHX, .DBF, .PRJ.
Tableau will only read the .shp file, despite this, do not delete the other 3 files, as they are essential for the correct functioning of the .shp.
Once imported in Tableau, you will only see one spatial field, called geography. Drag this onto the view and use the areas names dimensions to break up the view.
Since Tableau already has extensive mapping capability, you may wonder why should you use this method instead of properly formatting the geographical fields. In my opinion, this technique is useful for small areas that are not recognised by Tableau, for all other instances I would stick with the embedded Tableau capabilities.