
Which tools do you need?
The web offers several tools that you can use. However, here we are going to use Alteryx.
You don’t have Alteryx and would like to try it? Install the trial version here.
Are you a student or an academic? Do you work in the nonprofit sector? Then, check out this page.
Once you have it installed on your computer, you are ready to follow along!
What to download?
We are going to use:
– Alteryx Designer
– The Developer tools available both on Chrome and Firefox.
– Sublime text or the text editor you prefer.
Why not using the Data School website to practice web scraping?
This is what we are going to do!
Ready?
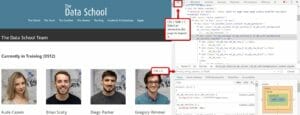
Let’s go to the Data School team page.
A genuine business case. Who are you?
You are a recruiter from a new analytics company.
What do you want?
You want to extract a dataset from that page containing four pieces of information about the DSers:
- Their names
- The links to their blogs
- The links to their pictures
- Their bios.
Basically, you want to move from:
The website

To its HTML code
To a simple table with only four columns.
| Name | Blog link | Photo URL | Bio |

If you are not new to HTML and the web scraping process → skip this part and go directly to “Time to move to Alteryx”. Otherwise, follow along!
Let’s have a first look at the webpage
But what is even a web page?
In very simple words (IT guys, please forgive me), it is a kind of database that holds all the data and posts. When you load that webpage, the web browser you use runs the code that fetches that data and displays it to you.
When your browser goes to this URL (Uniform Resource Locator), it’s unique. Your browser finds this HTML file, then processes all of it and produces the visual page that you can interact with.
What is the basic structure of the Team webpage?
It is quite straightforward, don’t you think?
- The header “Currently in training (DS#)”
- Photo, name, and bio of each DSer repeated over and over until DS1, the very first cohort.
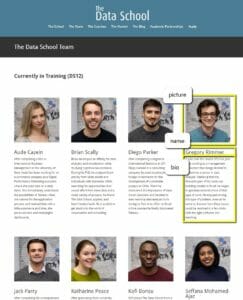
If we want to extract those four pieces of information, we need to look at the code behind the page.
Then, we are going to find a way to move beyond the messy strings of code and extract only the things that we want.
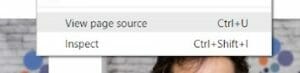
Let’s inspect the page. Right-click.
If you are using Chrome, you will see these two options:
- View page source
- Inspect
On Firefox, they will appear as:
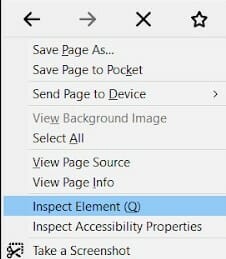
- View Page Source
- Inspect Element (Q).
Let’s click on Inspect.
Now you are able to see both the page and its underlying HTML code on the right.
Some basic tools:
- Highlight: the arrow at the top allows you to highlight a section of the page on the left and see the corresponding code on the right.
- Ctrl + F: allows you to find something in the code.
- What if you wanted to download the entire code? Right-click and select View Page Source instead of Inspect.

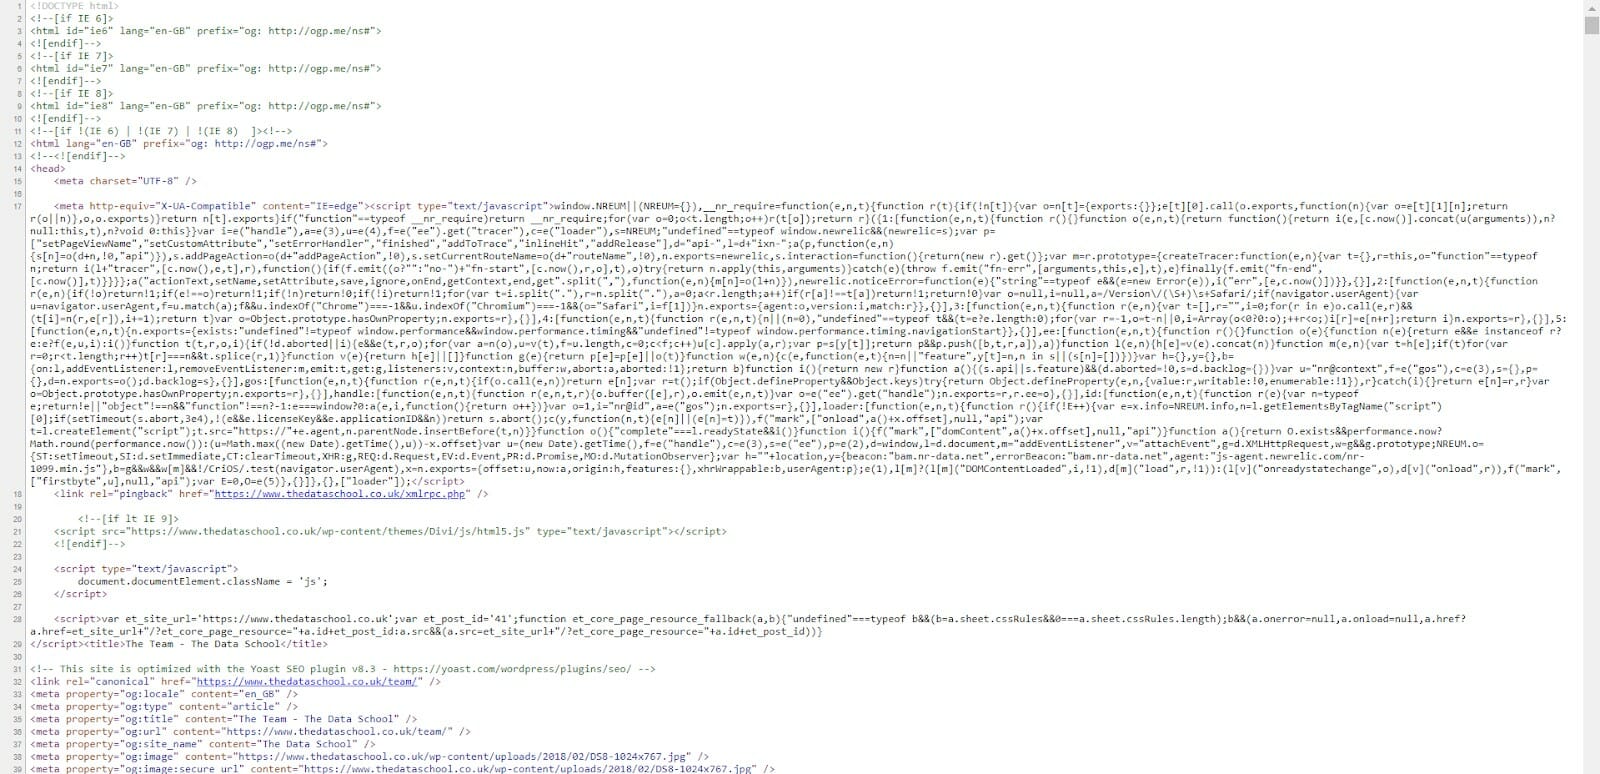
Here it is, the HTML code, starting at the top with <!DOCTYPE html>.
Select Ctrl+A to select it all and Ctrl +C to copy it.
Open Sublime Text or your favorite text editor. Then click on Ctrl+V and paste the HTML code.
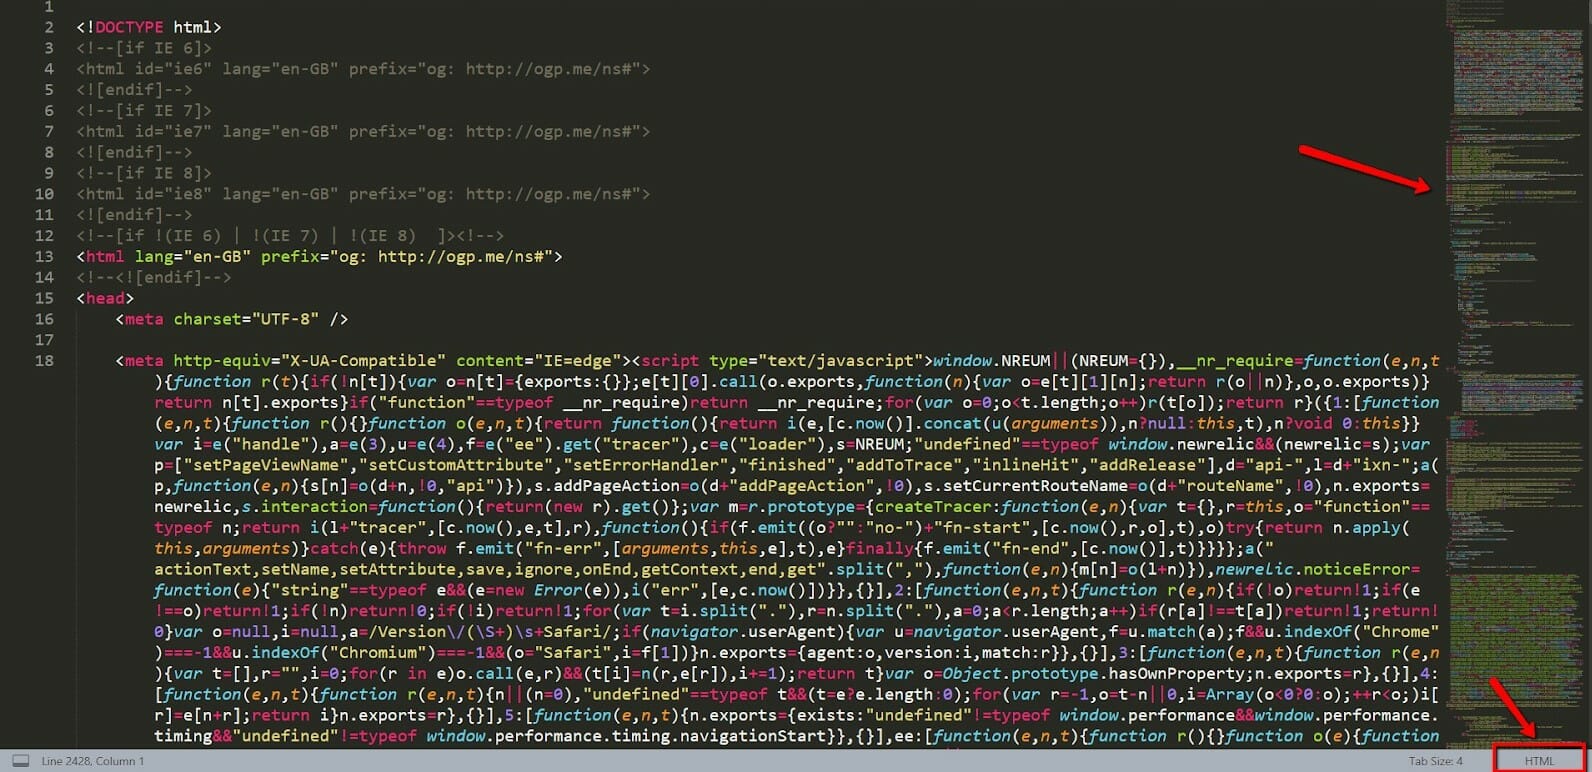
I like Sublime Text because it offers an overview of the code on the right. Plus, when you select the HTML syntax at the bottom right, it color codes the tags and automatically completes them with the end tags while you type the code.
I am not going to give you a short intro to HTML here.
If you need it, here’s a 3-min Youtube video for cavemen, which teaches you the only things you need to know. 🙂
The 3 things you need to know
- Each string of text is contained within tags.
<…> front tag
</…> end tag.
- In the screenshot above, you can see numbers on the left (only 1 to 18 in the screenshot). These correspond to the lines of code.
Don’t get confused by one string of code going down.
If the number on the left doesn’t change, it means that the string of code you are looking at is part of the same line! We are going to notice this in a second.
- A line break is created through backslash n (\n).
Remember the structure we talked about above?
Remember the structure of the webpage that we noticed before? Photo + Name + Bio, etc.? We are going to find it again inside the HTML code.
It’s good to have a clear idea of both the structure of the webpage and of the code since we are not going to be able to see it this clearly in Alteryx.
What do we want to scrape from here?
We want to use the text editor to spot the patterns, look for keywords. Once in Alteryx, we will start parsing out the code based on that pattern.
We will do a combination of:
- looking at the original webpage,
- finding the information we’re looking for in the code,
- then trying to detect where the patterns are. Once we find some,
- making an informed choice on the tools to use on Alteryx and how to set up our parsing.
We are part of DS11, so let’s use Ctrl+F and open the Search bar on the text editor.
Let’s type “Currently in training”. The first one that appears refers to DS12.
Let’s click Enter until we find the one referring to our cohort: “Currently in training (DS11)”.
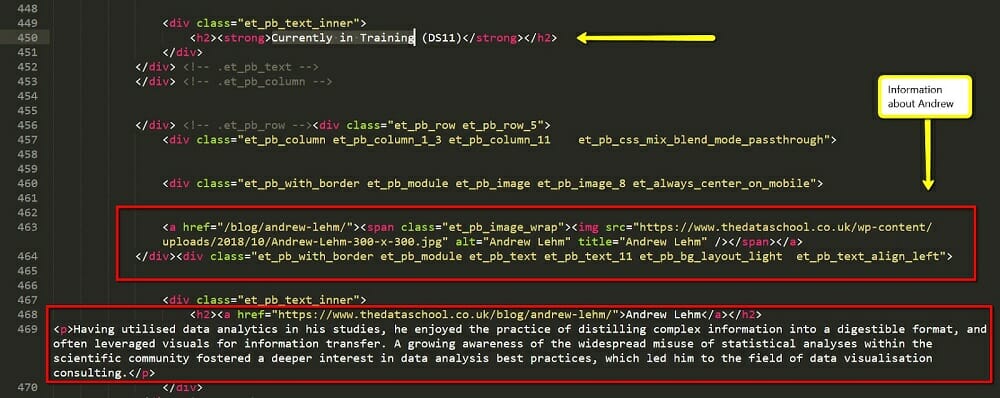
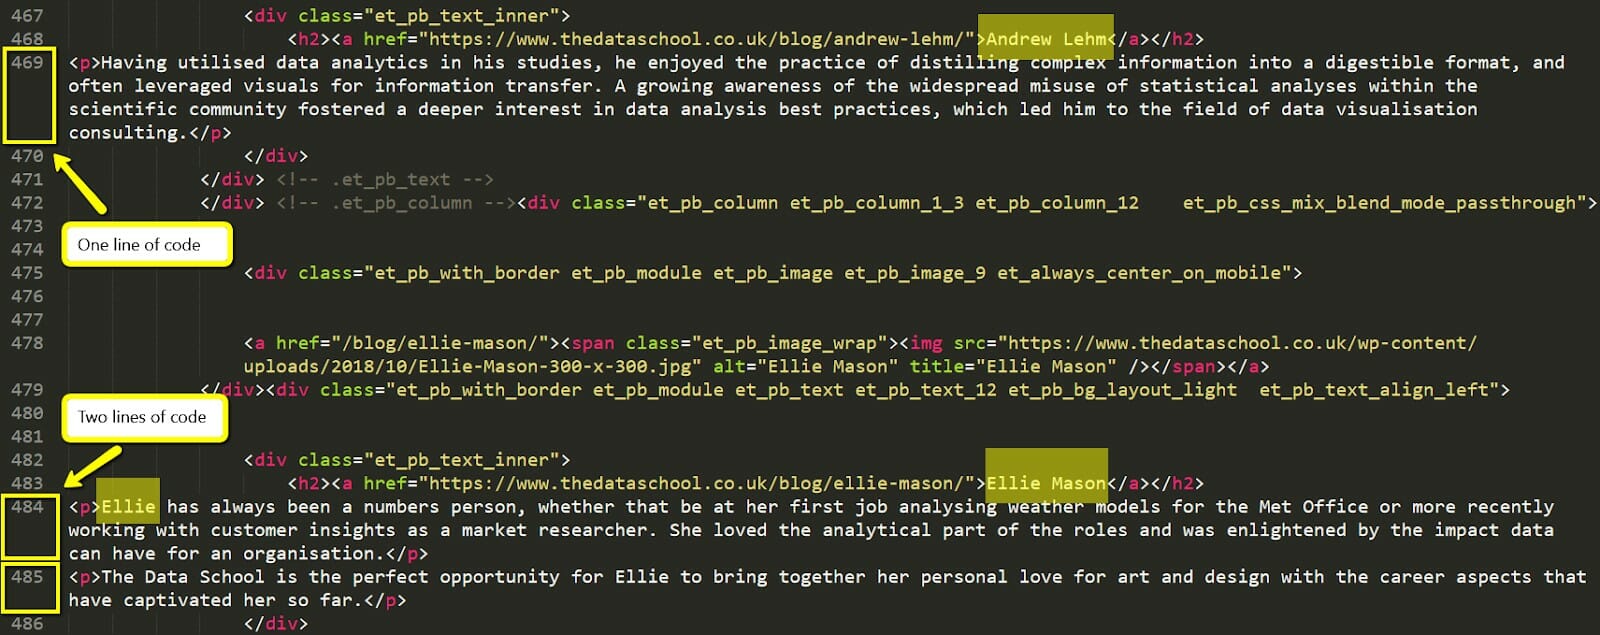
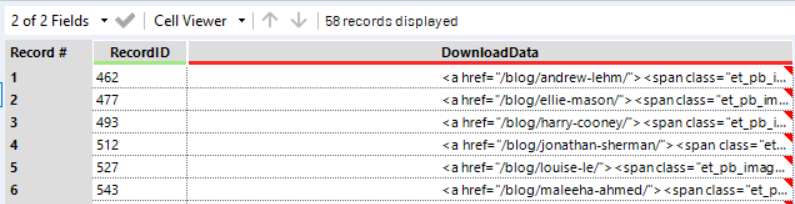
A few lines below, Andrew appears as the first DSer.
Line 463 contains all the information about him:
<a href=”/blog/andrew-lehm/”><span class=”et_pb_image_wrap”><img src=”/content/images/wordpress/2018/10/Andrew-Lehm-300-x-300.jpg” alt=”Andrew Lehm” title=”Andrew Lehm” /></span></a>
</div><div class=”et_pb_with_border et_pb_module et_pb_text et_pb_text_2 et_pb_bg_layout_light et_pb_text_align_left”>
The code for the other DSers, however, might be a little different. We are going to come across a few challenges.
Andrew’s description is in only 1 <p> tag, while Ellie’s is over 2 tags.
Time to move to Alteryx

From now on, trial and error is going to be the rule.
In the screenshot above, there is one way (actually two) to get to the same result.
If you are very comfortable with Regex, you might end up with a very short workflow with only a few steps.
I’ve assigned a number to each step so you can follow along.
Here’s a list of the main ones.
The logic behind it revolves around removing all the stuff that you don’t need to end up with a clean table.
1. Text Input: copy and paste the URL of the website (/team/).
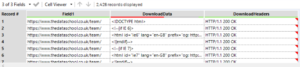
2. Download tool: this tool allows you to extract the entire HTML code of the page and output it to Alteryx as a string. In this case, untick “Encode URL text” and select data encoded as Unicode UTF-8.
Data is returned as a string or blob. Blob (Binary language object) is any sort of file that is not text, e.g. an image.
The Download tool gives you the option to output to a file. We are going to use it for the pictures later!
![]()
3. Cache and run: right-click on the Download tool and select Cache and Run Workflow. Thanks to this feature, the string is stored in memory and the tool doesn’t need to run every time you run the workflow.
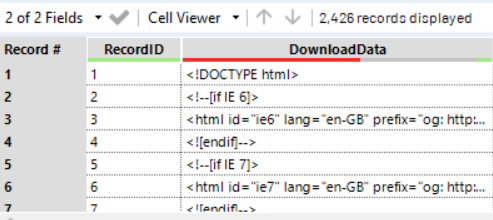
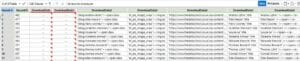
4. Text to Column: we mentioned above that \n defines a line break. Let’s use it here as a delimiter to create a new record (a new row) for each line of code.
The field is still messy and confusing, but we have found a way to break the entire code into smaller sections.
5. Let’s tidy up the table with the Select tool by removing Field1 and Download Headers.
6. Record ID: this is a good practice in web scraping as it allows us to create an ID for each record.
7. Filter: we are now trying to extract the picture link from the code.
Can you find anything unique in the string of code which refers to the pictures? Something that we can use to select those lines only?
“Jpg”, maybe? Unfortunately, no. Some pictures are in JPEG format, while others are in PNG. Try to look for both on Sublime. “Jpg” is not unique to all picture URLs.
There’s something else. though. Every picture URL contains this very unique string: “300-x-300”.
Therefore, we can filter the rows that contain it.

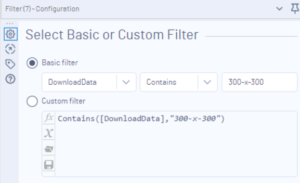
We have only 58 records now!
8. Text to Columns: If you double click on a cell and expand the space above, you can read the whole string.

The information we need is always after a = sign (the blog link after href=”, the picture link after img src=”, etc.). If we split the string into 6 columns using = as a delimiter, we start getting closer to our final goal.
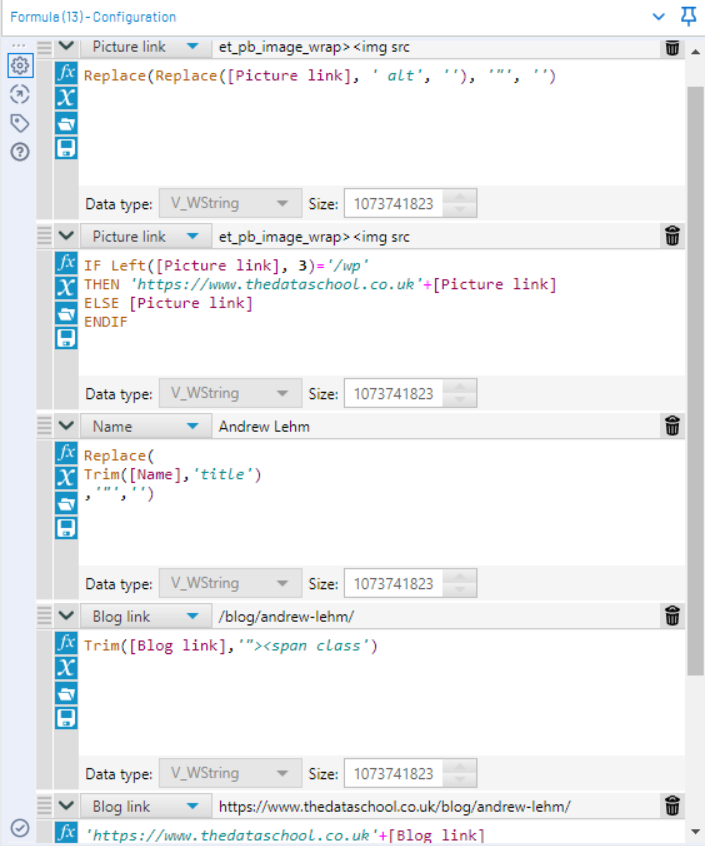
9. Let’s Rename the fields:
- DownloadData 2 ==> Blog link
- DownloadData 4 ==> Picture link
- DownloadData 5 ==> Name
11. Formula to clean the strings a little bit.
Now let’s download the pictures!
14. Download tool. First, save your workflow in a folder.
If we want to see the pictures directly on Alteryx, let’s uncheck “Encode URL” in the Configuration pane of the Download tool, select output to a Blob, and drag the:
15. Blob convert tool onto the pane.
- Conversion mode: from a Blob field
- String field ==> Picture link
- “Convert PNG, GIF or JPEG Blob to Report Snippet.
Let’s add a Browse tool, run the workflow, and we will see the pictures!
If we want to download the pictures on our computer, let’s go back to step 14, select “To a file” ==> Filename from a Field (select, for example, the “Name” field, and Alteryx will download the pictures in the same folder where we had previously saved the workflow itself. It will also name each picture with the name contained in the field “Name”.
We have now collected all that we need except for the DSers’ bios.
We are going to extract them in the next blog post.
We are also going to use Regex to get to the same result we have just obtained with one single step.
Stay tuned!