For our client project last week, we had a dataset which included the turnover and employment size for a large number of individual companies. In order to make a bit more sense of the data it was useful to split these fields into different categories / bands so that we could look at the number of companies that fall within a certain turnover band e.g. £1m – £2m or with a certain number of employees e.g. 1-4. To do this is very quick and only requires a few simple steps.
Step 1: Open a new Calculated Field
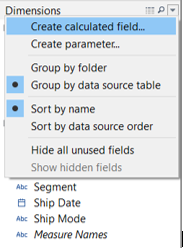
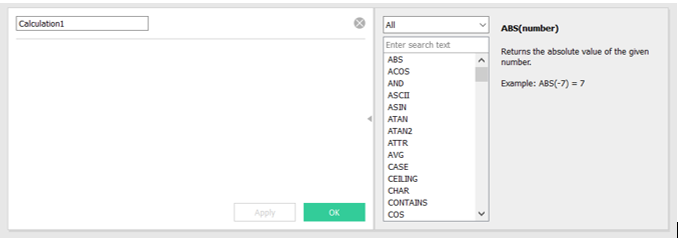
Once you have your data open in Tableau, go to the left hand pane where all your dimensions are listed, and click on the drop down arrow at the top by the heading Dimensions, and select ‘Create calculated field’. When you open a new calculated field there is a panel to the right which displays the functions you can use and a brief description of how to use them in your calculation.
Step 2: Rename your Calculation
If you are creating many calculated fields, it is really useful to ensure you have named them so that when you need to use them you can identify which is which straight away. It is also helpful to name each one something obvious so that you don’t have to go into the calculation to check what it is for.
Step 3: Add your Calculation
For this calculation I wanted to group various companies within certain bands based on their number of employees. Therefore, I used an IF calculation, because I wanted Tableau to test and return every data point within an expression (in this case the ‘number of employees’ field) as true when they fit within a certain criterion.
An IF calculation requires you to select the expression and create a (or a number of) ‘ELSEIF’ options if the data doesn’t fit within one criterion to offer another option where it will return as true. Tableau will read the calculation top to bottom and stop (return as true) when it finds the correct criterion. Because of this, for each IF calculation a final ‘ELSE’ is required, i.e. if the data does not fit within any other criterion then return it as, for example, ‘Other’.
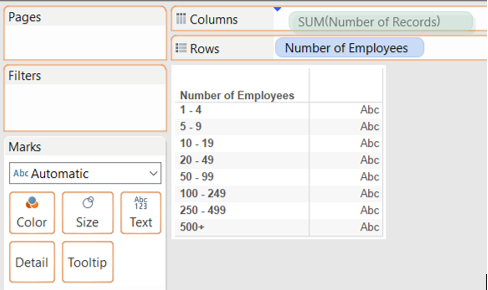
In this case I wanted to see how many companies had employees between the following bands:
1 to 4; 5 to 9; 10 to 19; 20 to 49; 50 to 99; 100 to 249; 250 to 499; 500+
When doing this kind of banding you should start your calculation from the highest value first. Therefore, I started typing out my calculation as follows:
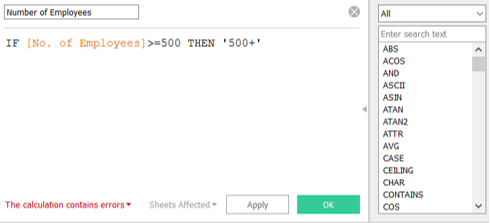
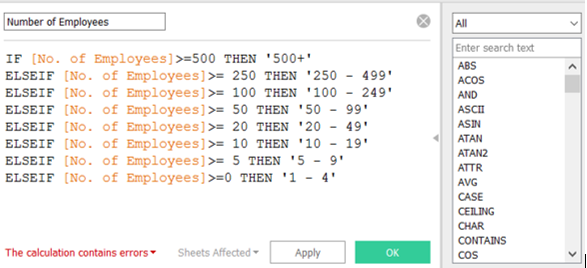
This essentially is telling Tableau that if any of the values within my measure ‘No. of Employees’ is greater than or equal to 500 then put it within the ‘500+’ category.
As you can see from the above, the calculation has errors in it, this is because I have not stated another option, i.e. currently there is no category for values that are not greater than or equal to 500. Therefore, there needs to be an ELSE function used. However, as I know that I am creating a number of categories, I need to use the ELSEIF function first.
I set out the remainder of my categories using exactly the same calculation as before until I had created all the categories I wanted to use.
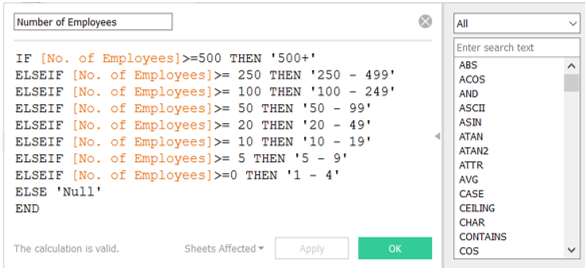
The calculation still contains errors because at this point there is still no final ‘ELSE’ option. I could therefore change the last category to just read ELSE ‘1 – 4’. However, if I had made a mistake within my calculation and missed out a category by accident, this could mean that a value that is not between 1 and 4 returns as true because it does not fit anywhere else. To avoid a potential error, I therefore decided to create a category for anything else titled ‘Null’. This way, before I use my calculated field I can do a quick check to see what is within the ‘Null’ category and see if there are values that should be elsewhere. Finally, the calculation needs an ‘END’ function to ensure it is valid.
Step 4 – Using your Calculated Field
Once you click OK, you will see your new calculated field appear within your other data fields on the left hand pane, in this case within the Dimensions. Next to the name of the field will be a tiny equals sign which identifies it as a calculation. You can then drag your new field to your rows shelf, add a measure to your columns shelf and away you go.