Parsing: in essence, breaking down a structure into its constituent syntactical parts to analyse individually.
Today Mina walked us through one of her parsing challenges. Alteryx is a lot easier to tackle when someone is guiding you through so maybe this can be of help to others as well.
The data we were provided with came in three seperate files, each one organised slightly differently, some items capitalised, with underscores instead of spaces, multiple values in a single column etc. The data required not only parsing, but also transformation and cross-tabbing, so these will be introduced here as well.
The first task was to compare the format that the final document should be in to the format in the original three files and then establish a workflow for sorting the data.
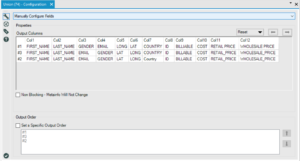
Mina provided us with the format for the final document:

The first of the files looked like this:

You’ll notice that the names in the file are both contained within a single column separated by a comma, and there is an extra column called “LONG”, but other than that the file is in relatively good order.
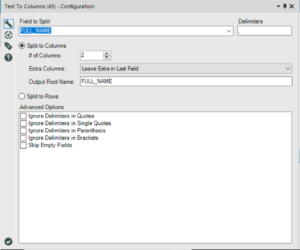
The text to columns tool can be used to pull apart the names. The field to select is the one that contains the values you want to split, namely “FULL_NAME” and the delimiter is the character you want to split on, in this case the comma. The delimiter will not be retained by either column so will be deleted completely. You can select the number of columns you wish the text to be split into, in this case we chose two – one for each name.
This resulted in two new columns of data, each with either a first name or a surname.
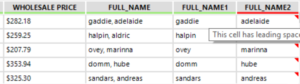
You’ll notice that the second full name column is red, hovering over one of the cells reveals the error message This cell has leading spaces. First we used the select tool to unselect the unwanted columns (“LONG” and “FULL_NAME”) and then the data cleaning tool to remove the leading spaces.
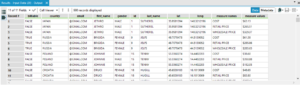
Next, we looked at our second data set:

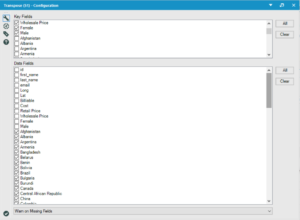
The main feature of this data set is that male and female are split into two columns with the value “1” in one of the columns, and that each country is a column header, with a value of “1” denoting location. To resolve this we used the transform tool to bring the countries down into a single row. The key fields are all the fields you want as your column headers, and all the data fields are those you want to sort into columns. Alteryx cleverly un-ticks those data fields you have ticked in key fields, however if you un-tick them in data fields, Alteryx won’t re-tick them in the key fields section, so watch out for that!
To resolve the issue of the genders in separate columns we used a formula tool;
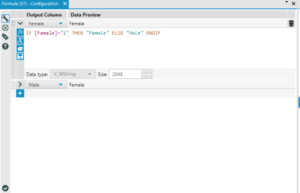
Essentially the formula looks at the “female” column and where it sees a “1” it changes that to female and where there is no value it changes that to male. This is based on the assumption that there are only two genders here to choose from.
This results in the female column containing the gender data. The select tool can be used again to remove unwanted rows and rename to match the desired final format:

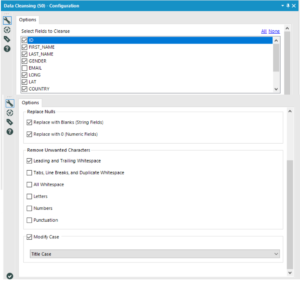
We then used the data clean tool to title case the BILLABLE column, ie. change “true” to “True” to match the desired format.
The third file was the most difficult to get our heads round:
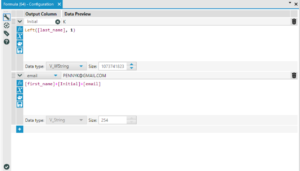
Firstly, it required the measure names “COST”, “RETAIL PRICE” and “WHOLESALE PRICE” to be crosstabbed to column headers. It also required us to create email addresses using first names, surname initials followed by @gmail.com.
Crosstab – the values you choose to group data by will be included in the table of data, the value you select for new columns names will logically make up the new columns, and the value selected for the new columns will make up the rows.
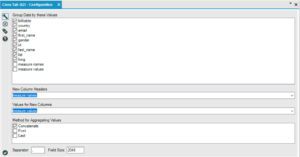
In our case we grouped by all the variables except measure names (“COST”, “RETAIL PRICE” and “WHOLESALE PRICE” and measure values ($s):

To create the email addresses we used a formula tool with two separate formulas:
We followed this with the select tool again to rename the column headers and the data clean tool to change all the text to Title case.
All our data files were then in the same format, so we were ready to combine them using the union tool, which combines data files one on top of the other (as opposed to the join tool which sticks them one next to the other).
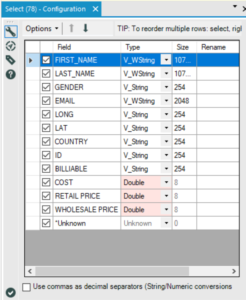
The next issue was that the “COST”, “RETAIL PRICE” and “WHOLESALE PRICE” columns were in string format instead of numerical, requiring a change with the select tool. However before we could do that, we had to get rid of the $ in-front of all the values, as this would confuse Alteryx.
We used a Multi-field formula to edit multiple cells of data. Use the drop down bar at the top to select the format of field you wish to alter and then craft your formula in the box below.
Multi-field formula does not yet have the ability to suggest and autocomplete formulas once you begin typing, but what you can do is drop the formula tool onto your workflow and begin writing your formula in there until it auto-completes, then simply copy it into your multi-field formula.

This simply trims off “$” where it is found as the left-most character in the selected fields.
We followed this with the select tool to convert format into doubles (a numerical format – for a great description of the different file types see here).
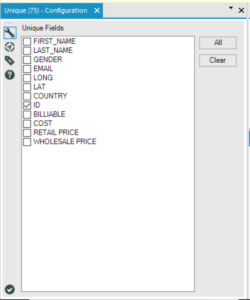
Finally we used the unique tool to filter out any duplicates, based on the “ID” column.
With this our data was ready to export!